

How To Create Animation In Procreate
Many people have been waiting on a Procreate animation option, and recent additions to the system did not disappoint.
For the first time, you can easily take your favorite drawing tool and use it to make stunning 2D animations.
If you love making art in Procreate and have been waiting to get animating, you will love this tool.
It brings all of the power of Procreate and offers you even more.
Already people are beginning to make absolutely amazing videos with these tools.
Procreate has really made animating simple, but they still offer everything that you need to make stunning animation on Procreate.
Creating and Managing Frames
The core of any animation tool is the ability to create and control frames.
Frames are the different images that will eventually come together to create your 2D animation.
In order to use frames effectively, you must know how to create and manage them.
Procreate animation is a fairly simple process, and they have made it easy for you to get the right to work with a few simple taps.
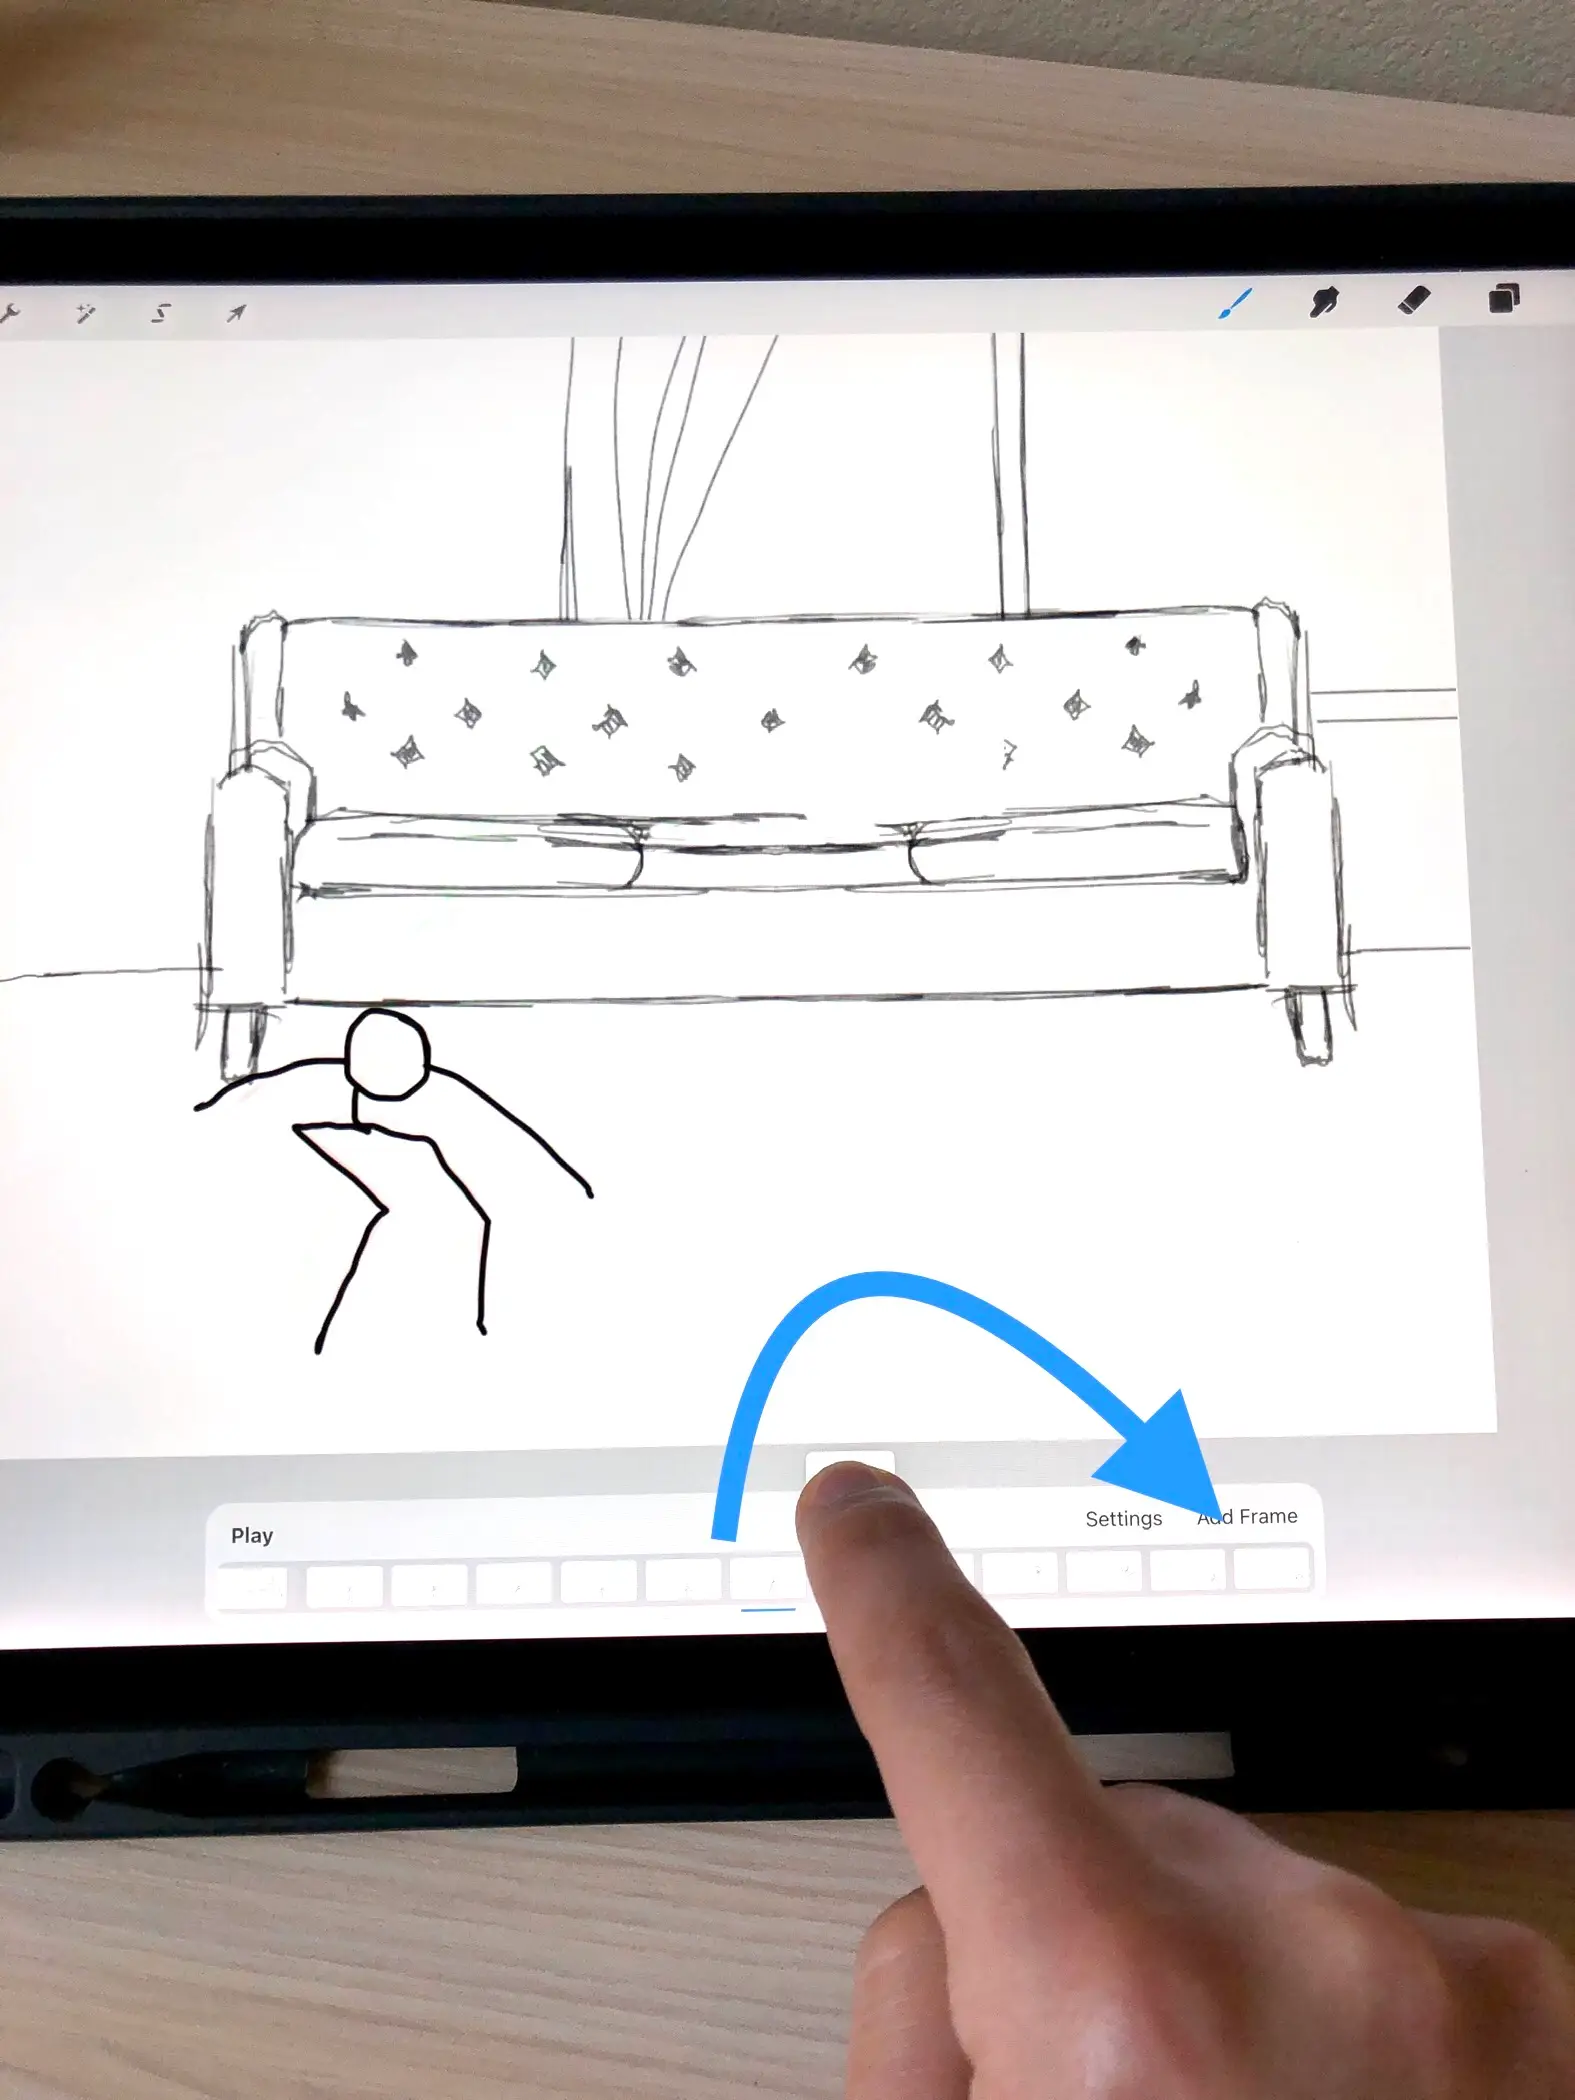
Using the add frame button, which is a rectangle with a "+" in the middle, you can easily add a new frame.
After you have added several frames, you might realize that you want to rearrange them.
Fortunately, Procreate lets you easily rearrange frames by simply opening up the frame list.
You can view all of your frames here and rearrange them as needed.
This can be helpful, particularly if you might be creating frames that are out of order.
This also makes it easy to add in a new frame at a later time in the event you realize that you have been missing something.
Improve your Procreate watercolor painting with my Procreate Watercolor Brush Set. What I love about these brushes is it comes with a special template that helps you paint realistic watercolors very easily, video tutorials to help you get started, and more than a dozen brushes!
Drawing in Frames
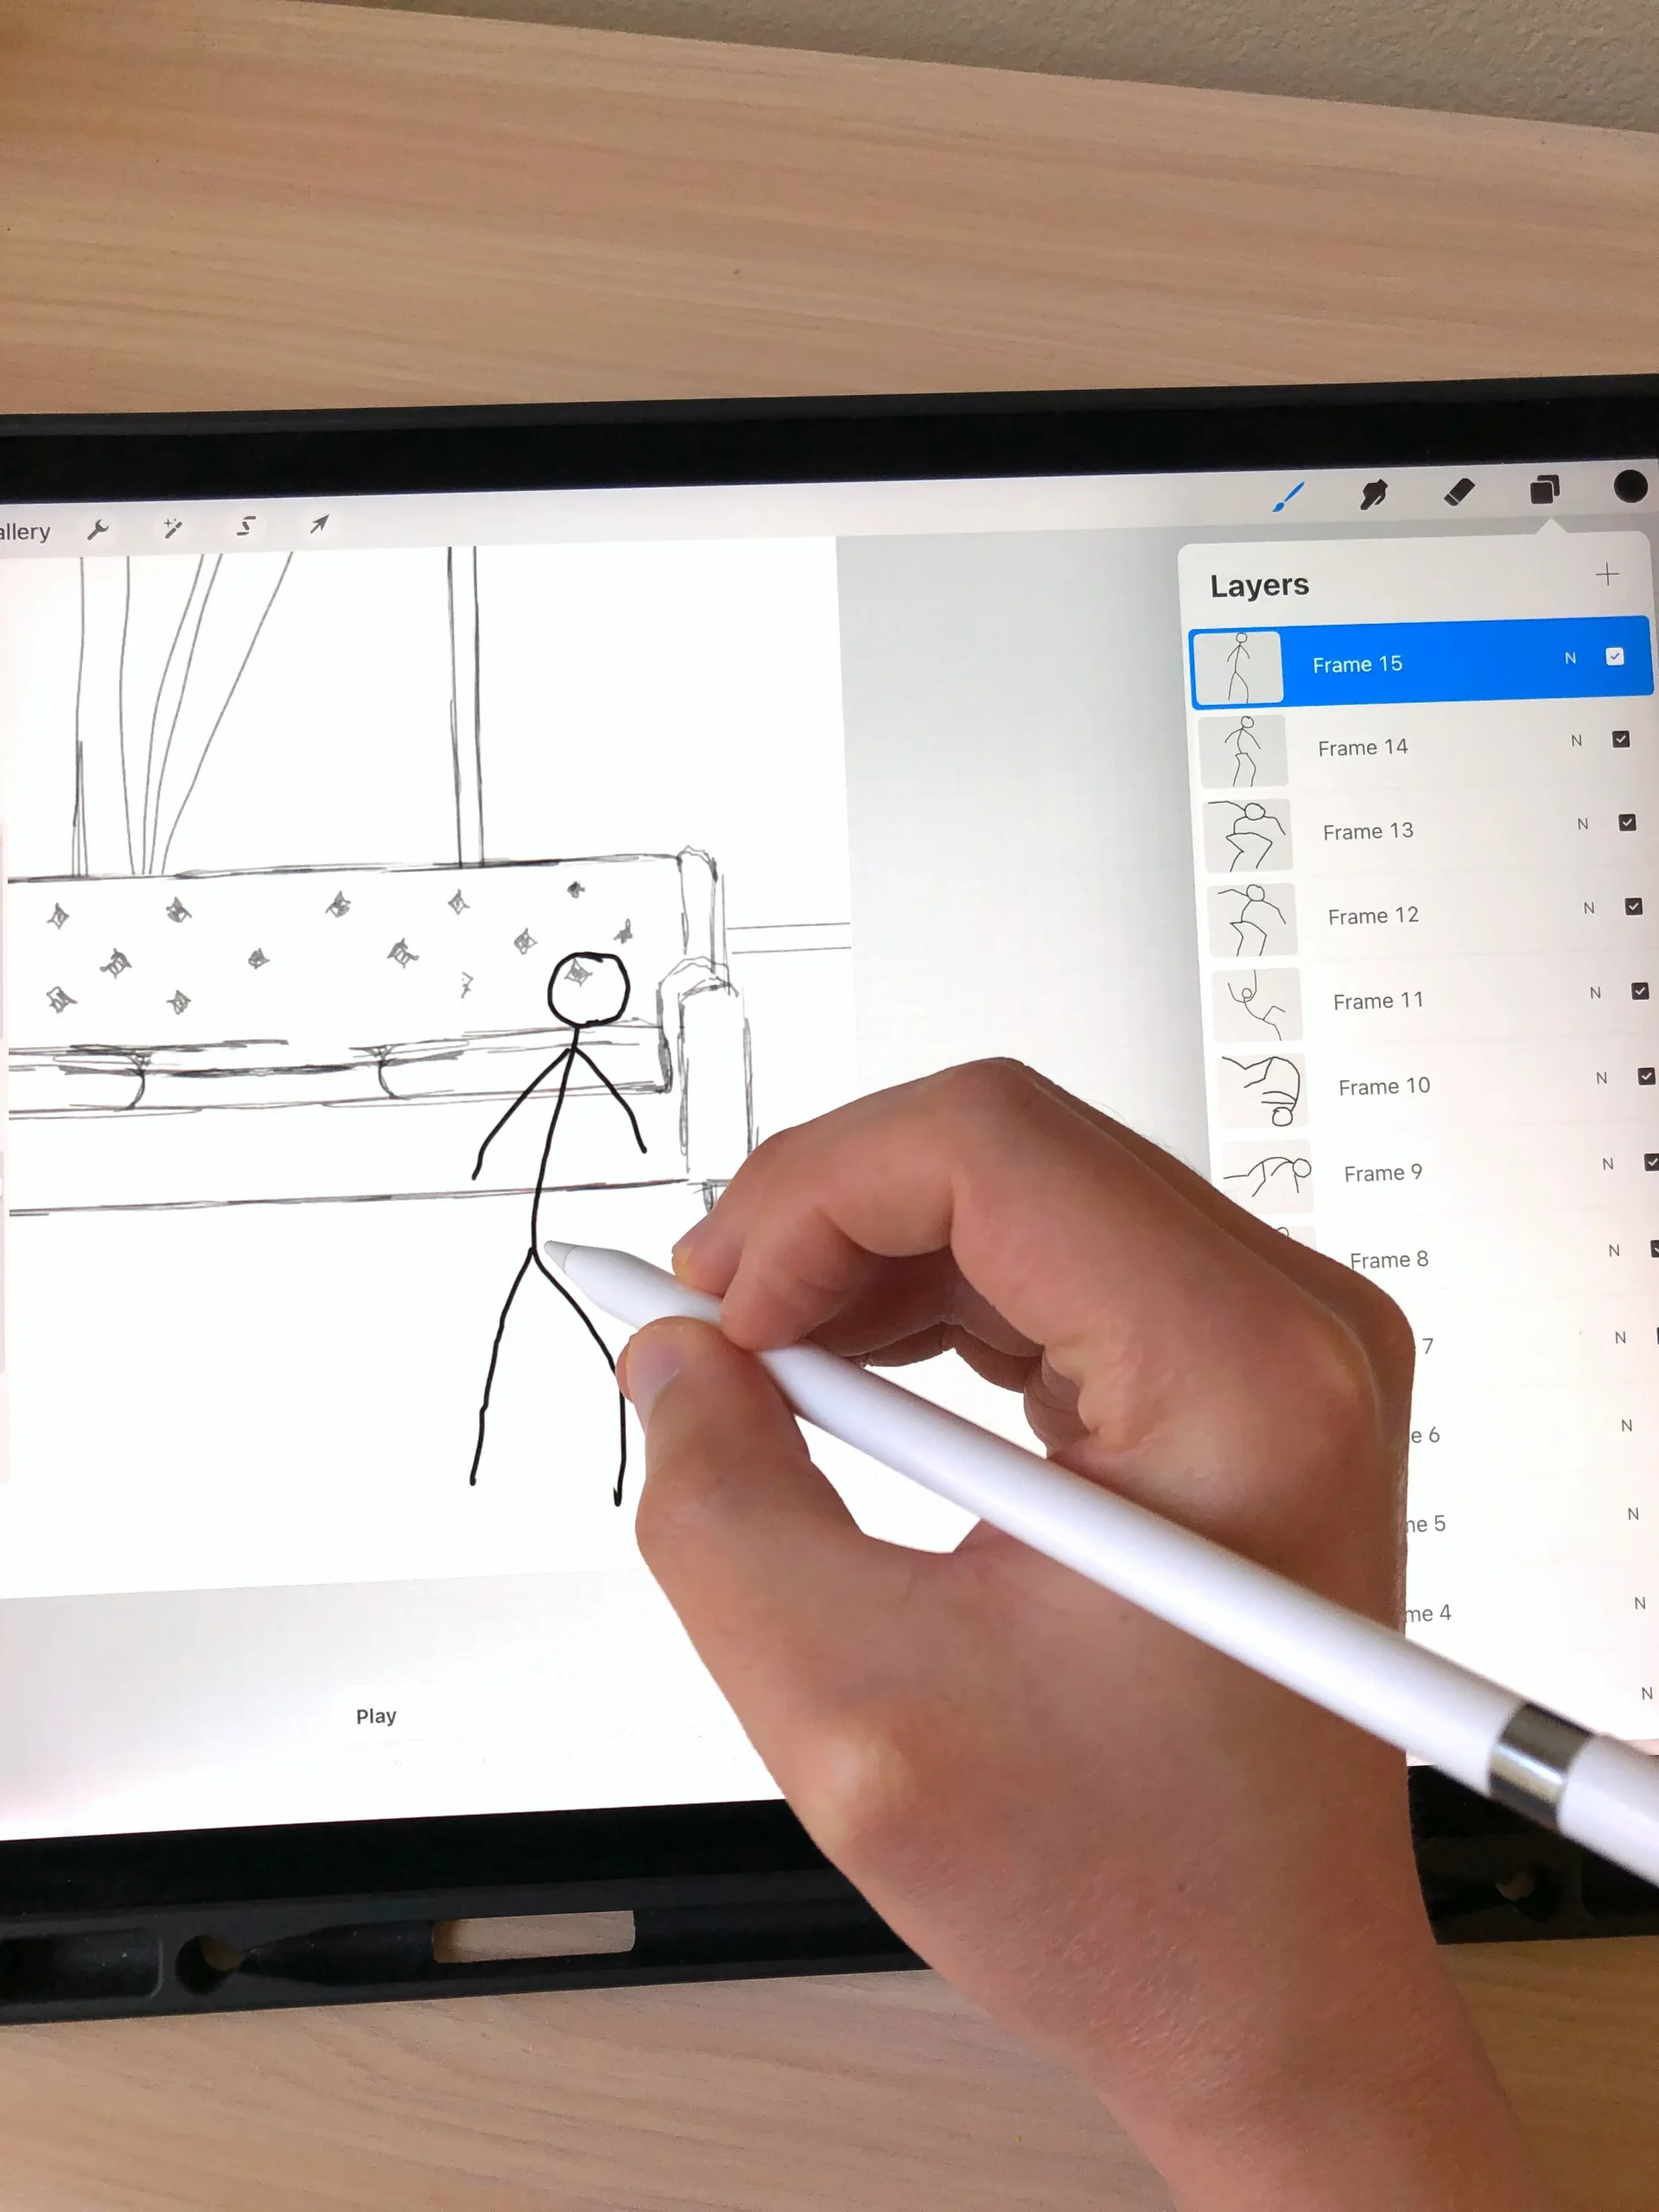
Drawing in frames is easily the most simplistic part of the process of how to animate in Procreate as long as you are familiar with the app.
In the same way that you would with a regular drawing, you will use the tools to draw the image that you want.
When it comes to animation on Procreate, the way that you draw each frame is absolutely crucial.
You want them different enough to justify the frame being added, but similar enough to not make the animation drawing.
There are a few ways to go about this.
Using Procreate's expansive collection of drawing tools, you can easily make highly detailed frames.
Depending on what you are animating, you might find that you need to reuse some frame materials to avoid redrawing the same background repeatedly.
However, if you are more focusing on a single character in space, you might find that you want to just draw it over every single time.
If you want basic Procreate animations, you can simply draw the new element subtly altered in every single frame.
For more complex options, you might want to copy the previous frame and then adjust key elements instead.
For example, if you're learning how to draw a dog, you can draw each step as a separate layer.
Each layer would be a frame in the animation after you turned on the animation assist feature.
You can also use Procreate's onion skin frames in order to reference the previous frame, which makes tracing over it easier.
Using this, you can customize in a way that still matches the previous frame.
Moving Through Frames to Demo
At the foundation of knowing how to animate in Procreate is the slider bar tool.
When you first begin to animate, you will find that this bar does nothing.
That is because it cannot do anything until you hit a point where you have multiple frames.
After you have begun to add your frames, this slider bar will make it easy for you to skip from one frame to the next.
This makes it great for doing demos and for moving back to a previous frame for other adjustments.
When you move this slider at the bottom, you can move backward and forwards along the timeline for your animation.
You might find that you want to move it along the timeline to see where everything will fall as you animate.
This process makes it easy, and can also show you how different frame speeds might look.
Using it as a manual approach to moving from one frame to the next is also beneficial because it can show you where you might have missed something.
Using this approach to demo makes it easy to spot the places where you might have forgotten something subtle in your scene.
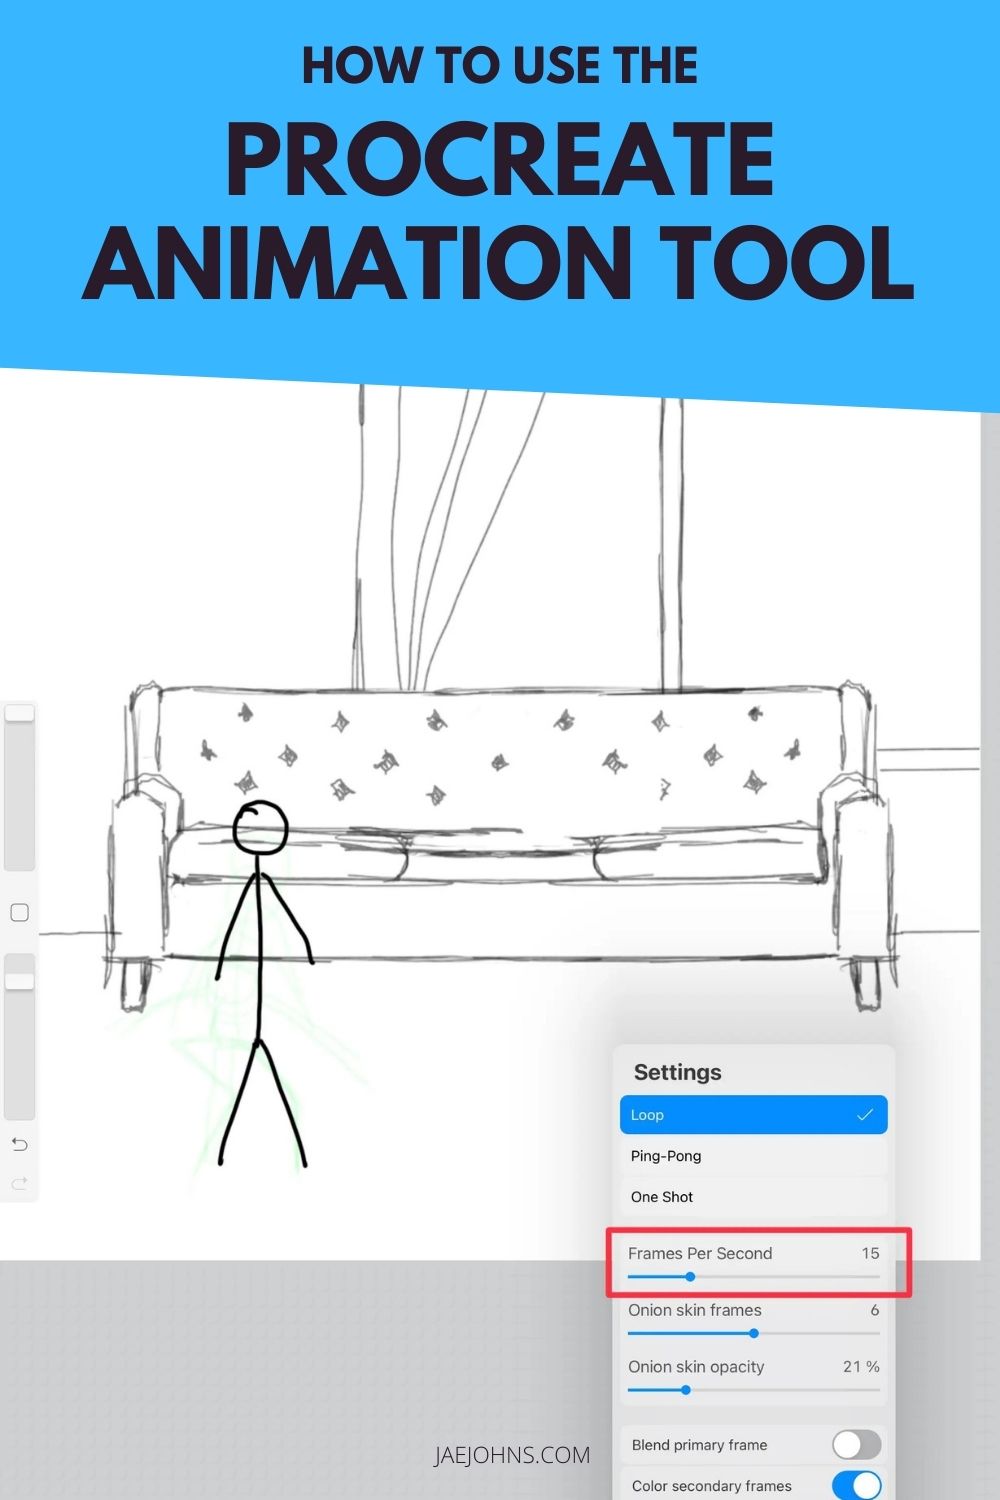
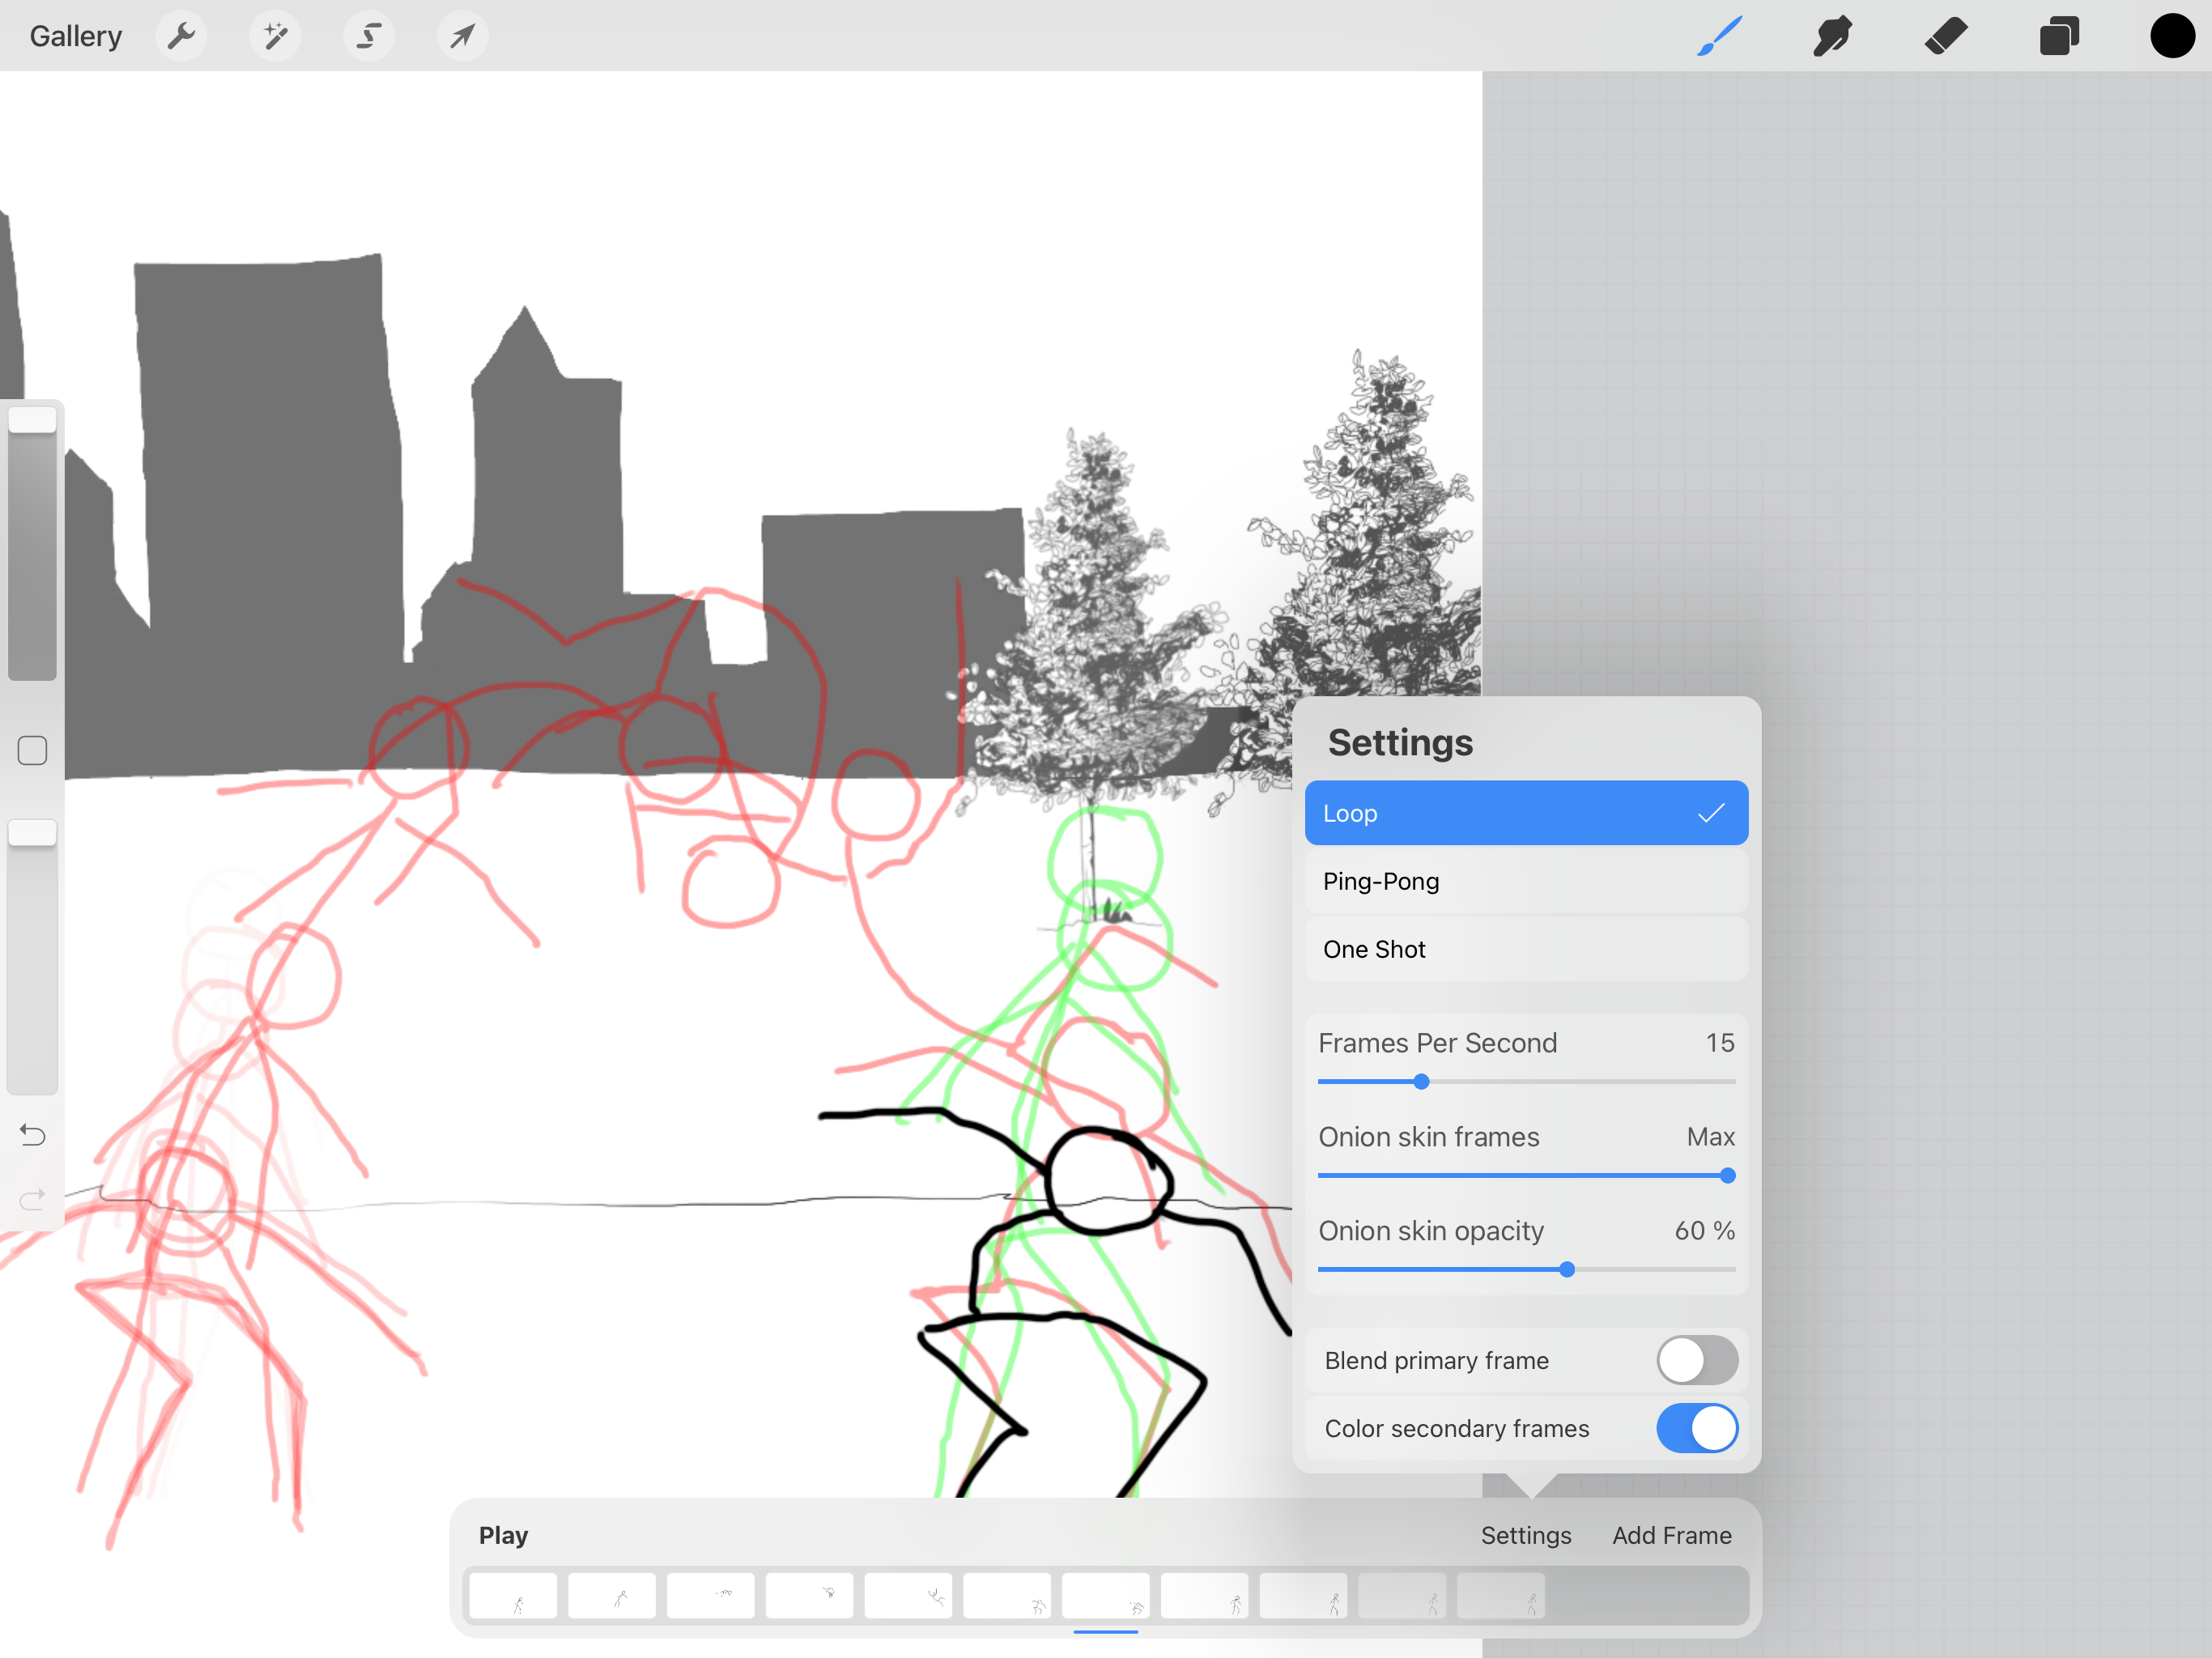
Adjusting Frames Per Second
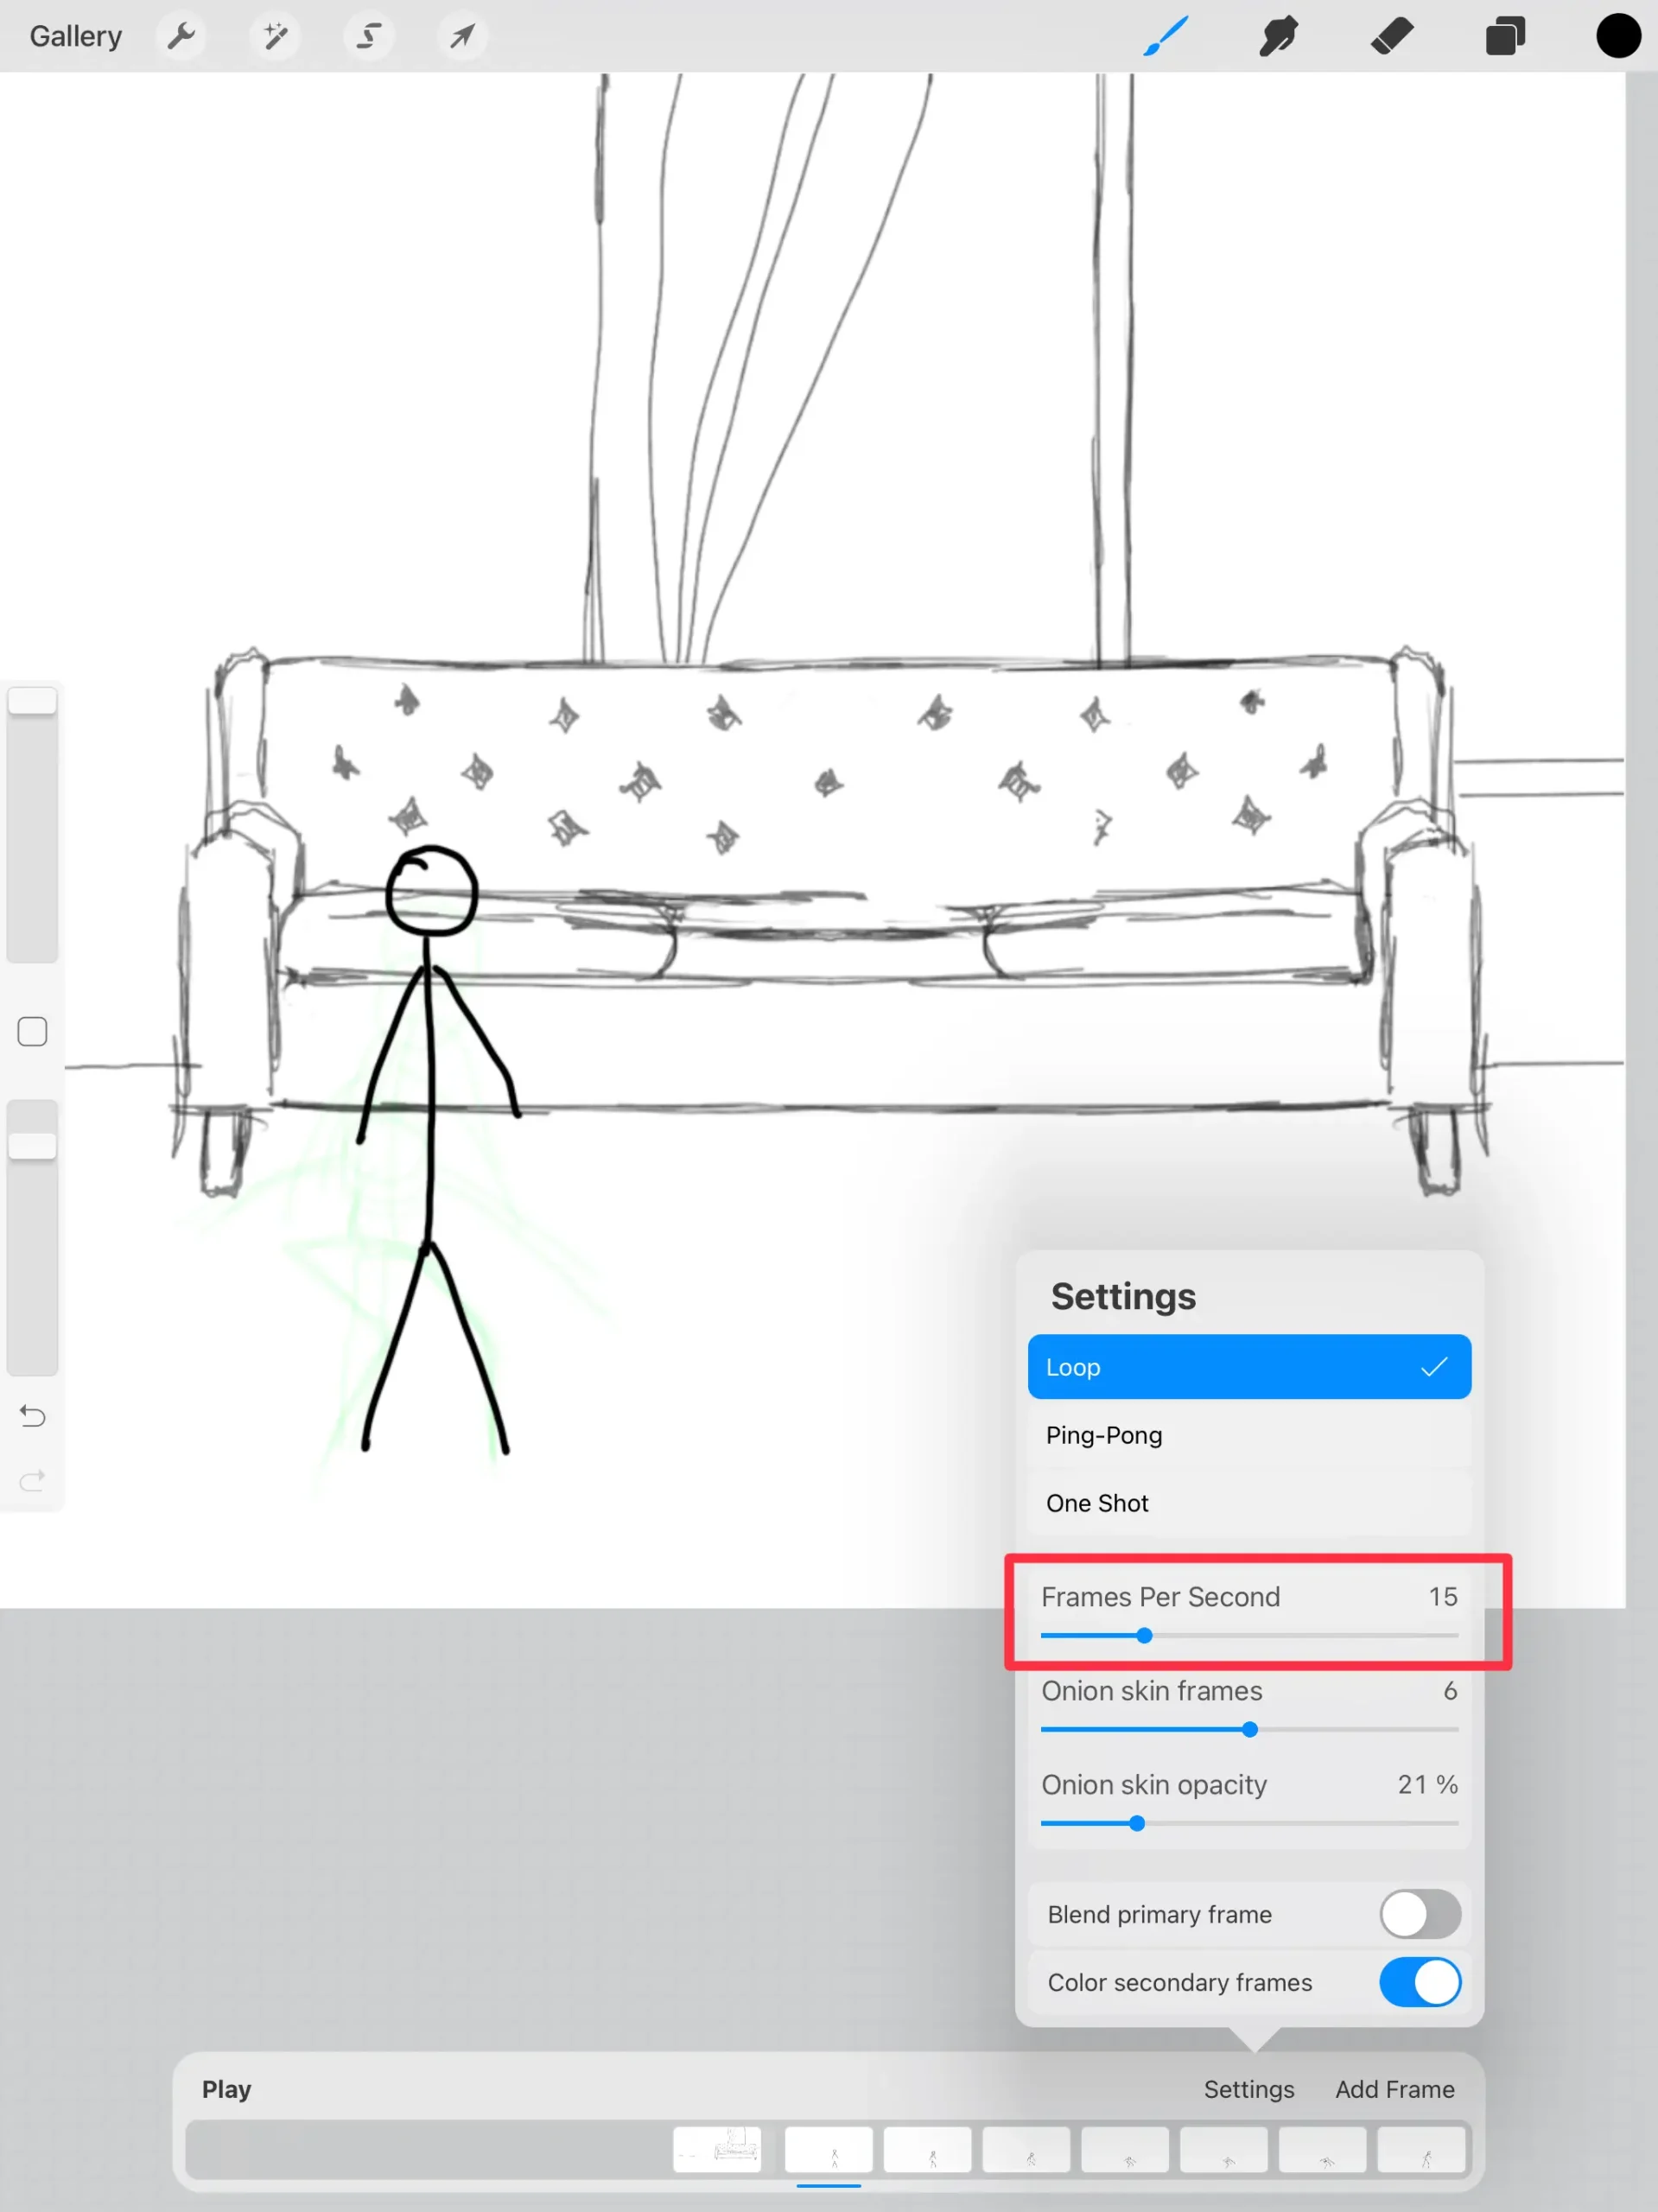
The frames per second is a crucial point of focus for any animator.
Depending on your animation style, the number of frames per second, also known as the frame rate, might make or break your animation on Procreate.
Choosing the right speed can play a fairly significant role when it comes to spotlighting in your animation.
If the speed is too high, you might force your viewers to miss out on an element entirely.
On the other hand, if your animation speed is too slow, you might find that your animations do not look correct.
A common problem with slower animation speed is jerky movements, so when you are using Procreate animation software, you will need to try different speeds.
Finding the right speed for your Procreate animation project is a fairly simple process.
Unless you have created an astonishing amount of frames, chances are you won't want to use higher speeds.
The end result here would be a very short clip.
On the other hand, if you have frames that shift relatively significantly or have a higher amount of them, using a slow number of frames per second can make your animation seem more jarring.
Experiment by adjusting the amount while you view the project to see what feels right.
Adjusting Onion Skin Frames
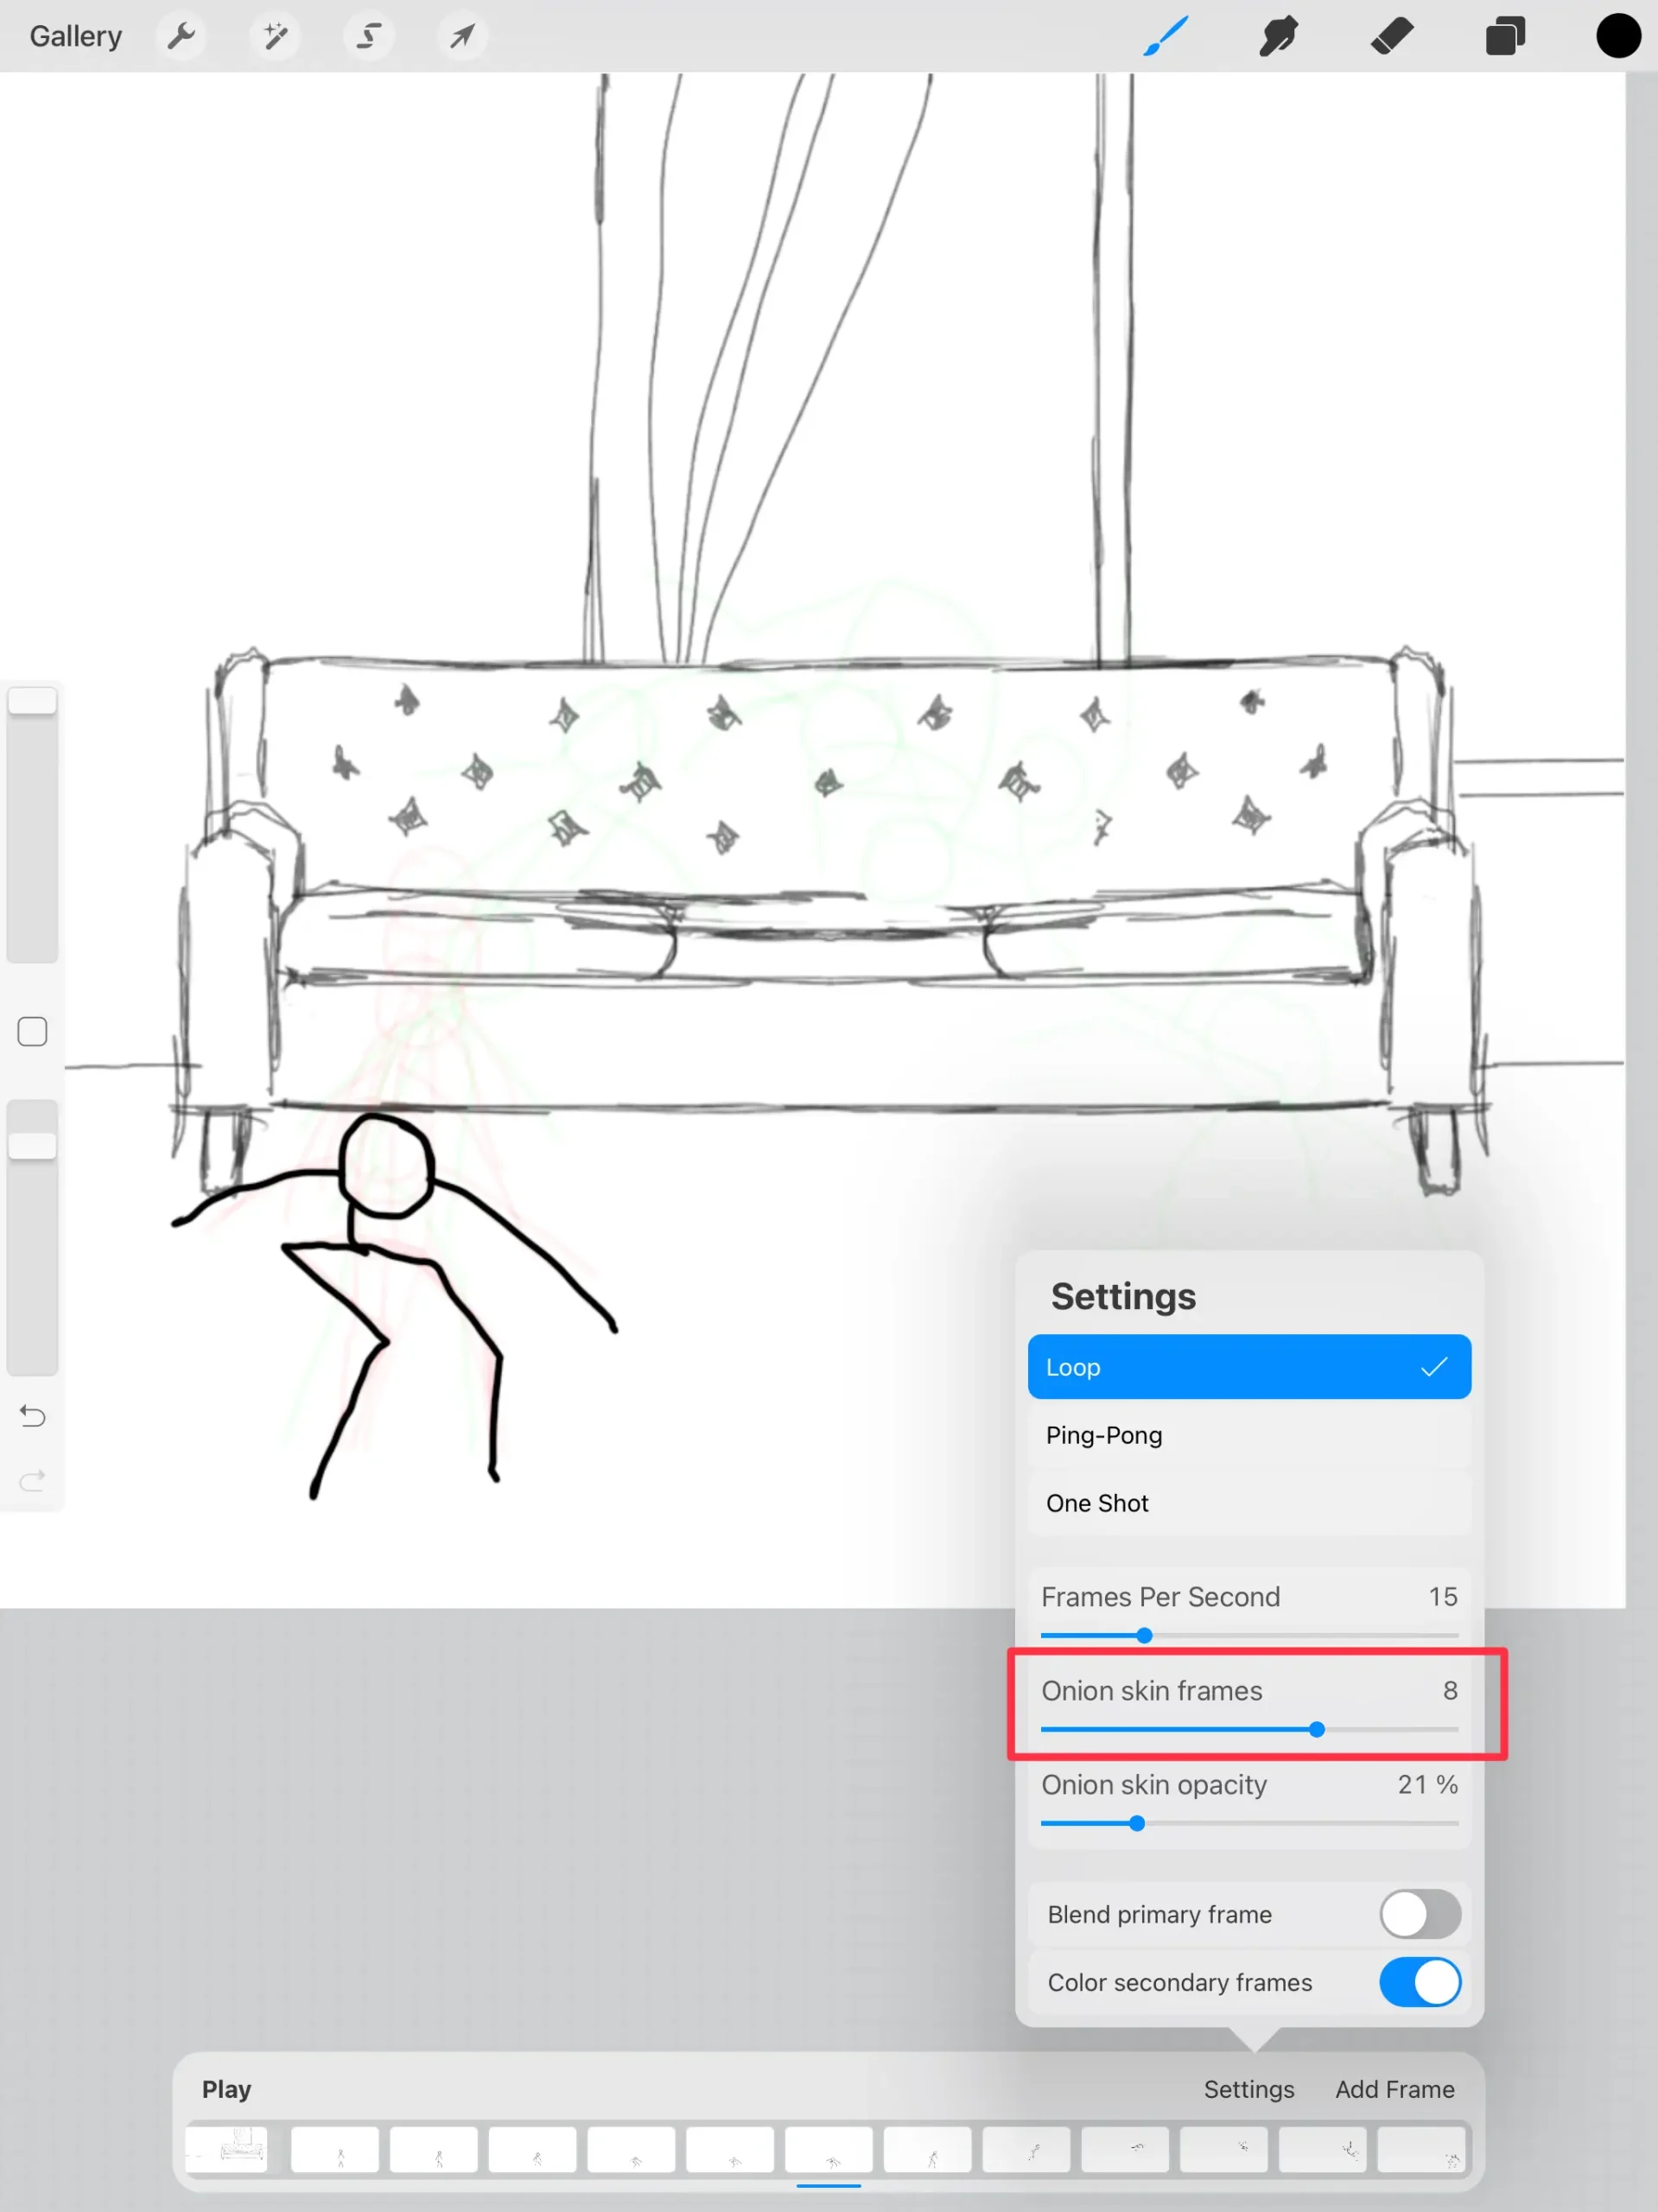
Onion skin frames are one of the more compelling features within Procreate animation software.
These frames allow you to see a broader picture of your animation.
It is a truly helpful feature, but there are definitely some instances where it works better than others.
An onion skin frame is used to show multiple animation slides at any given point in time.
While it might sound a little strange, it can be really helpful when you are working on drafting new slides.
You can use this to see where you were as well as where you plan to go.
Depending on what kind of animation you are creating, you will likely want to adjust how many onion skin frames you can see at a time.
If you are making a simple ten frame short of a character walking, you will likely be able to enjoy all ten frames at once.
This can make it easy for you to create, add, and review as needed.
However, for more complex scenes, you might find yourself looking for only one or two frames.
It is also important to remember that this process doesn't work very well if you are going to work on something incredibly complex.
It can be difficult to distinguish from one scene to the next when you are dealing with more detail.
Adjusting Onion Skin Frame Opacity
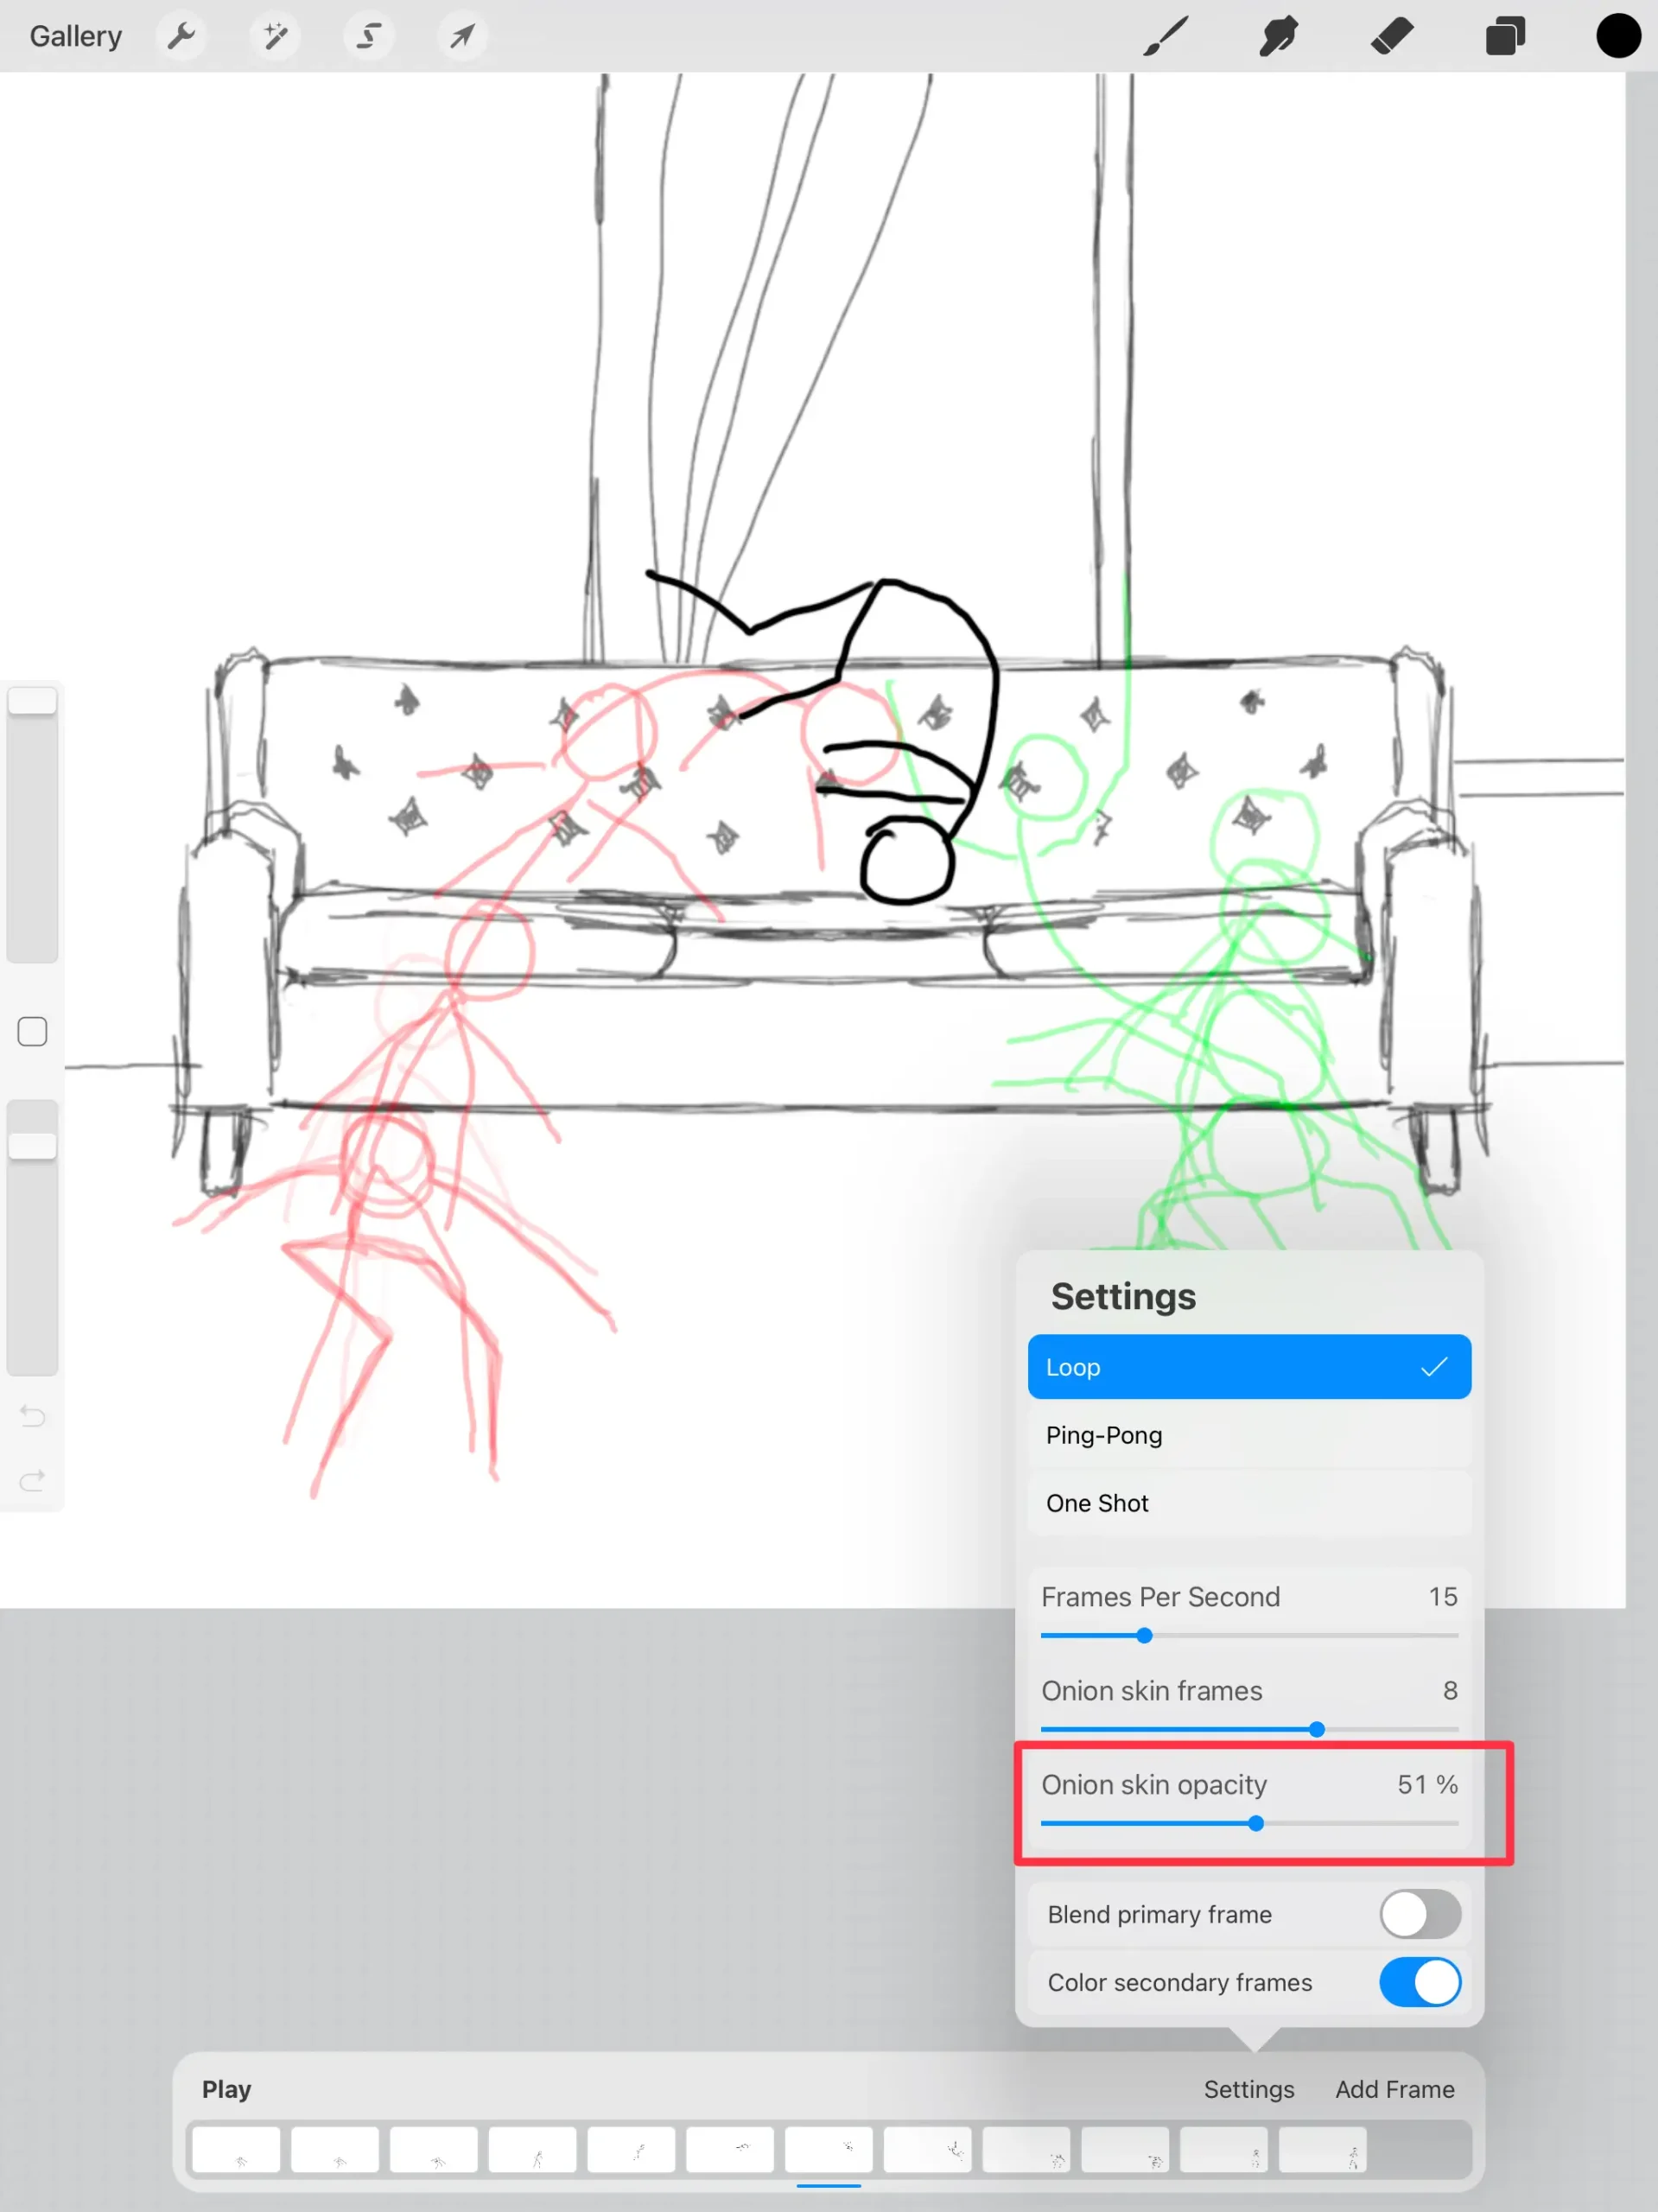
When you are working with onion skin frames, you will want to adjust the opacity in some instances.
While the base level for opacity might be fine when you are working with a simple animation or practicing, it isn't always right.
As you begin to grow your Procreate animation skills, it is these little tools that will help you to make more complex work.
The opacity of the onion frame is how dark or light the onion frames are in relation to the primary frame.
As you work with onion frames, the Procreate blend primary frame will always be the darkest and boldest.
Though you can certainly adjust the opacity of the onion frames to match that, people generally don't.
This is because it can make it more difficult to focus on the correct frame.
When this occurs, it is easy to accidentally make adjustments for the wrong frame as you work.
If this happens, you will find yourself deleting and recreating, which wastes time and energy.
Fortunately, you can make these frames as dark or light as you need to for the right outcome.
If you want to trace, you might want the frames a little darker.
If you are just using them for reference, a faint outline might be good enough.
Play around with the opacity bar to determine what is best for your project, and lean on this as a constant part of your process.
Procreate Blend Primary Frame
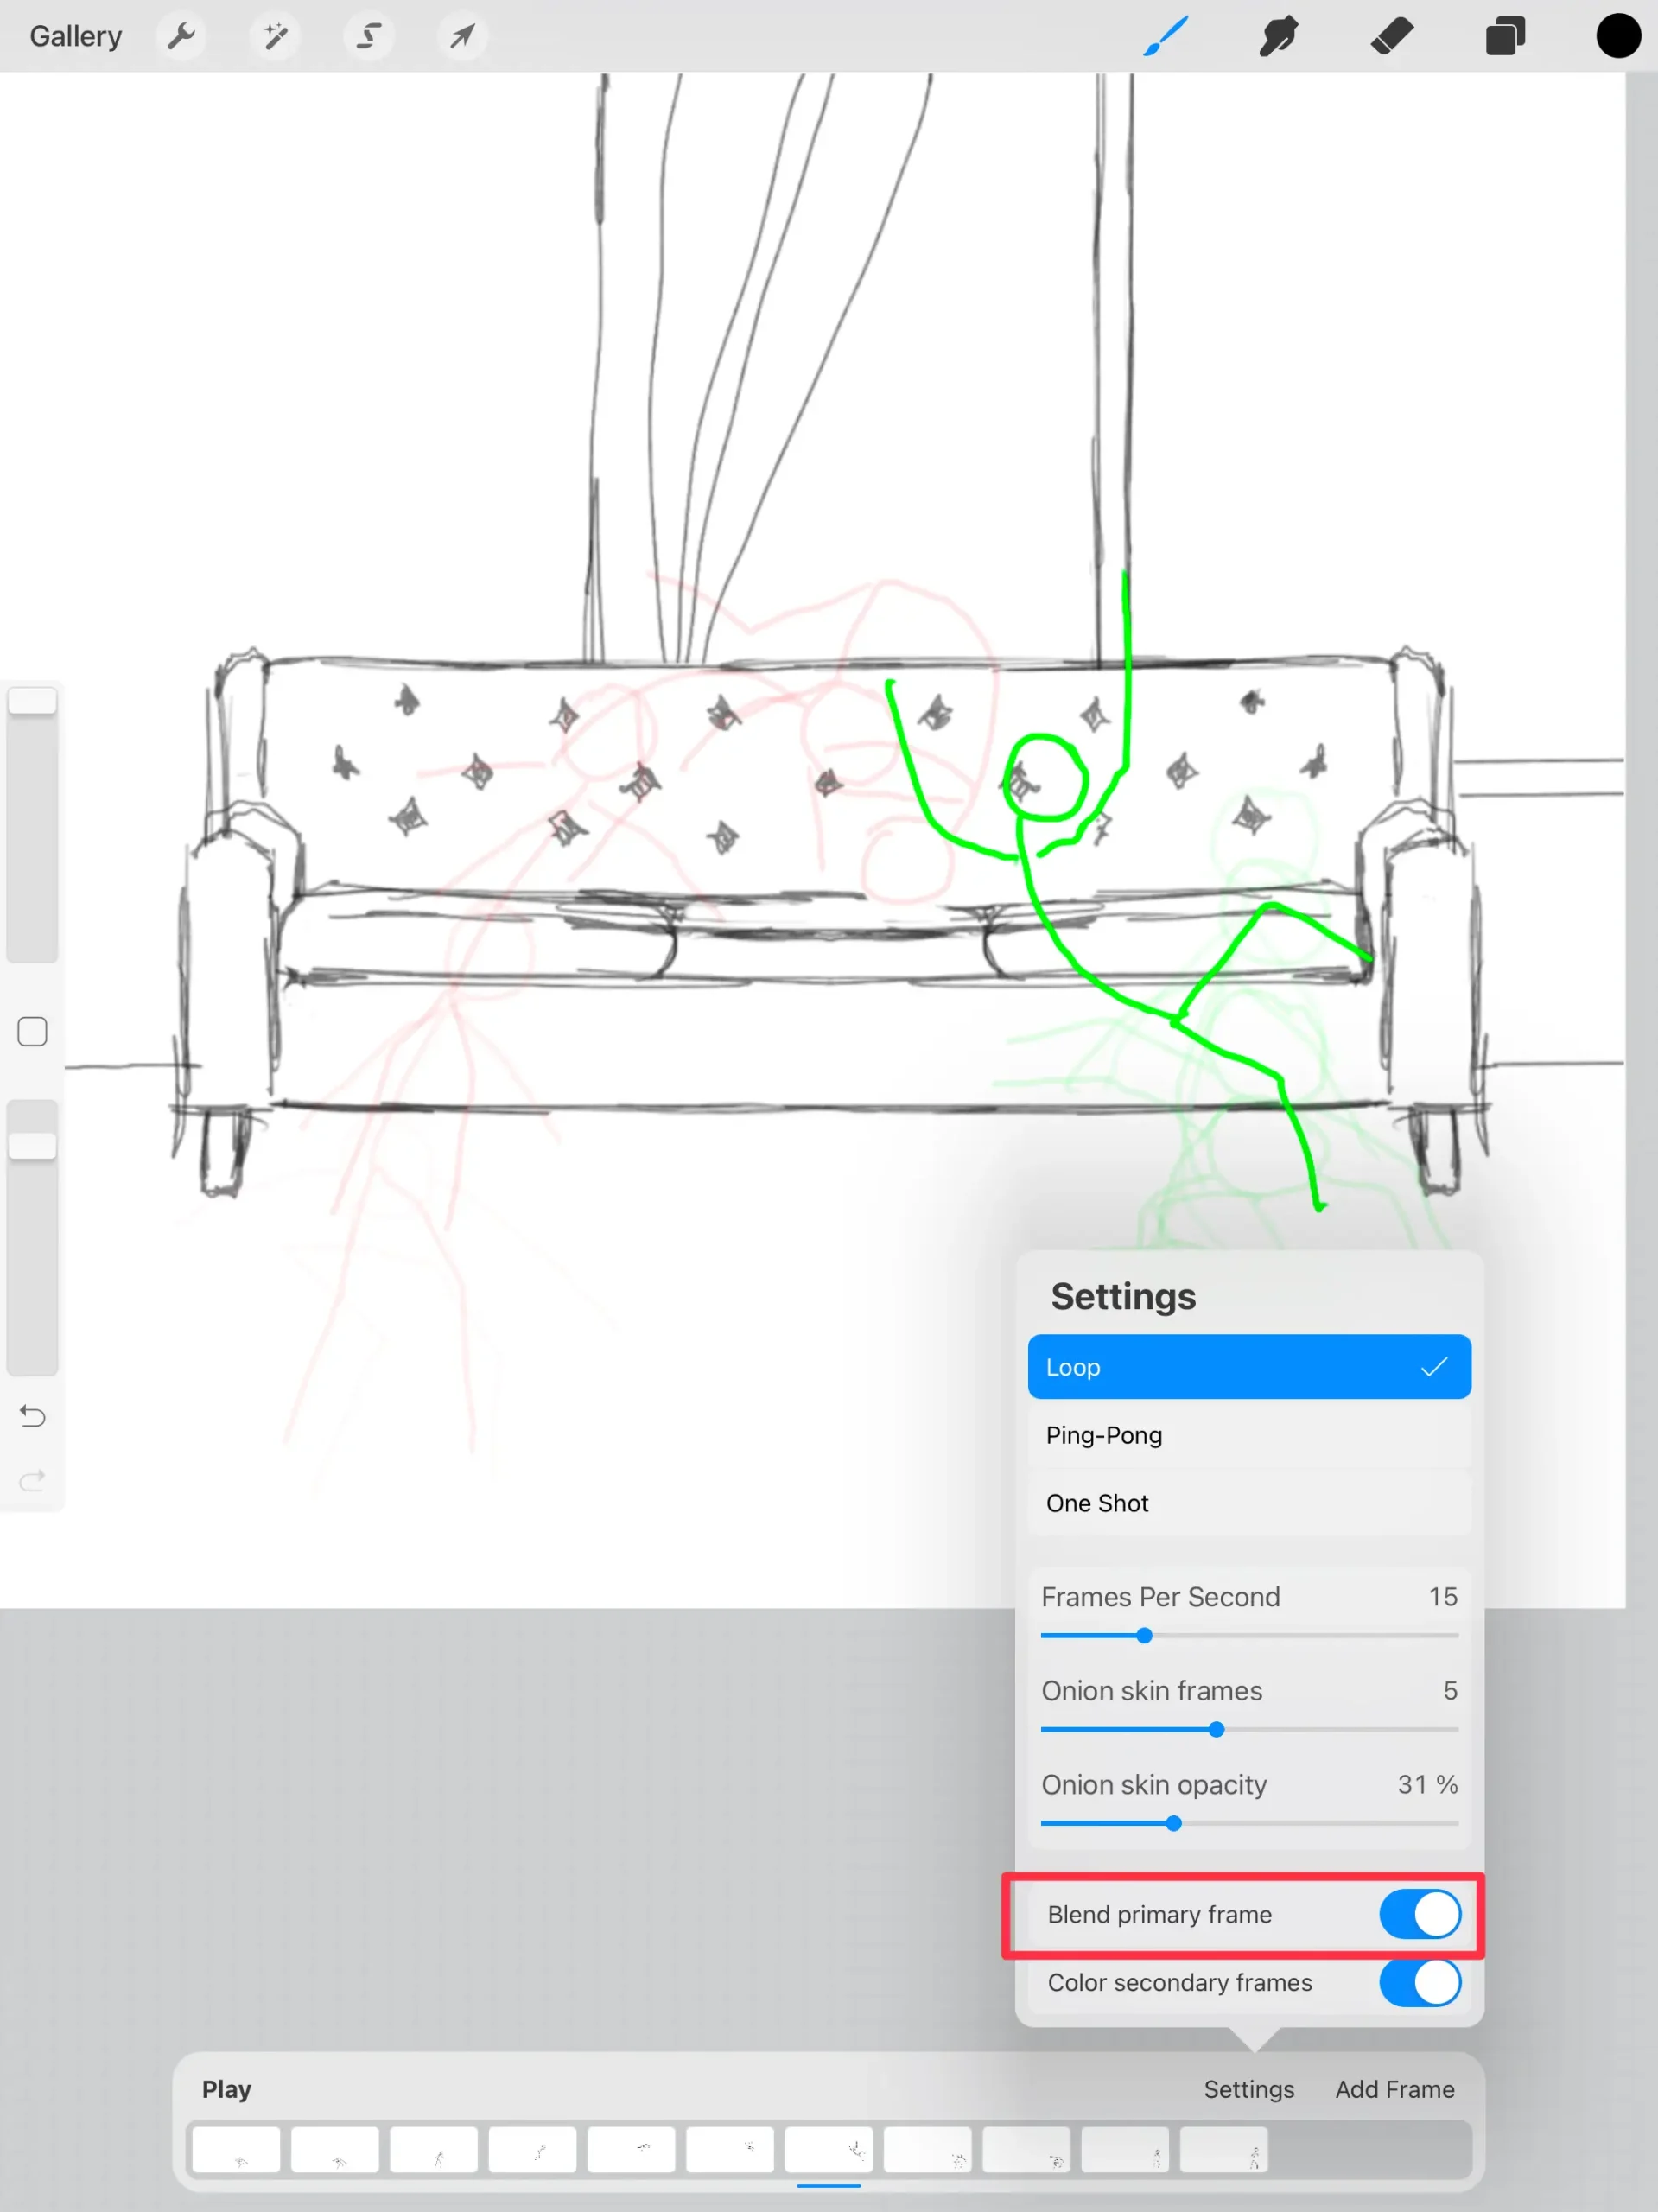
The Procreate blend primary frame option in the
Procreate animation tools list is an unspoken gem.
Many people have no idea what this tool does, even when they use it.
However, once you realize what it does, you will want to use it all the time.
In Procreate, your primary frame is the frame that you are currently working on at any given point in time.
You can slide along these using the bar at the bottom.
When the blend primary frame option is deactivated, your primary frame will be completely solid with everything beneath it being blocked out.
However, when you activate the blend primary frame option, the opacity of the primary frame will alter just slightly to give a more blended appearance with other frames.
This allows you to easily see your primary frame without losing out on what is behind it.
Get realistic watercolors easily with my Procreate Watercolor Brush Set. What I love about these brushes is it comes with a special template that helps you paint realistic watercolors very easily, video tutorials to help you get started, and more than a dozen brushes!
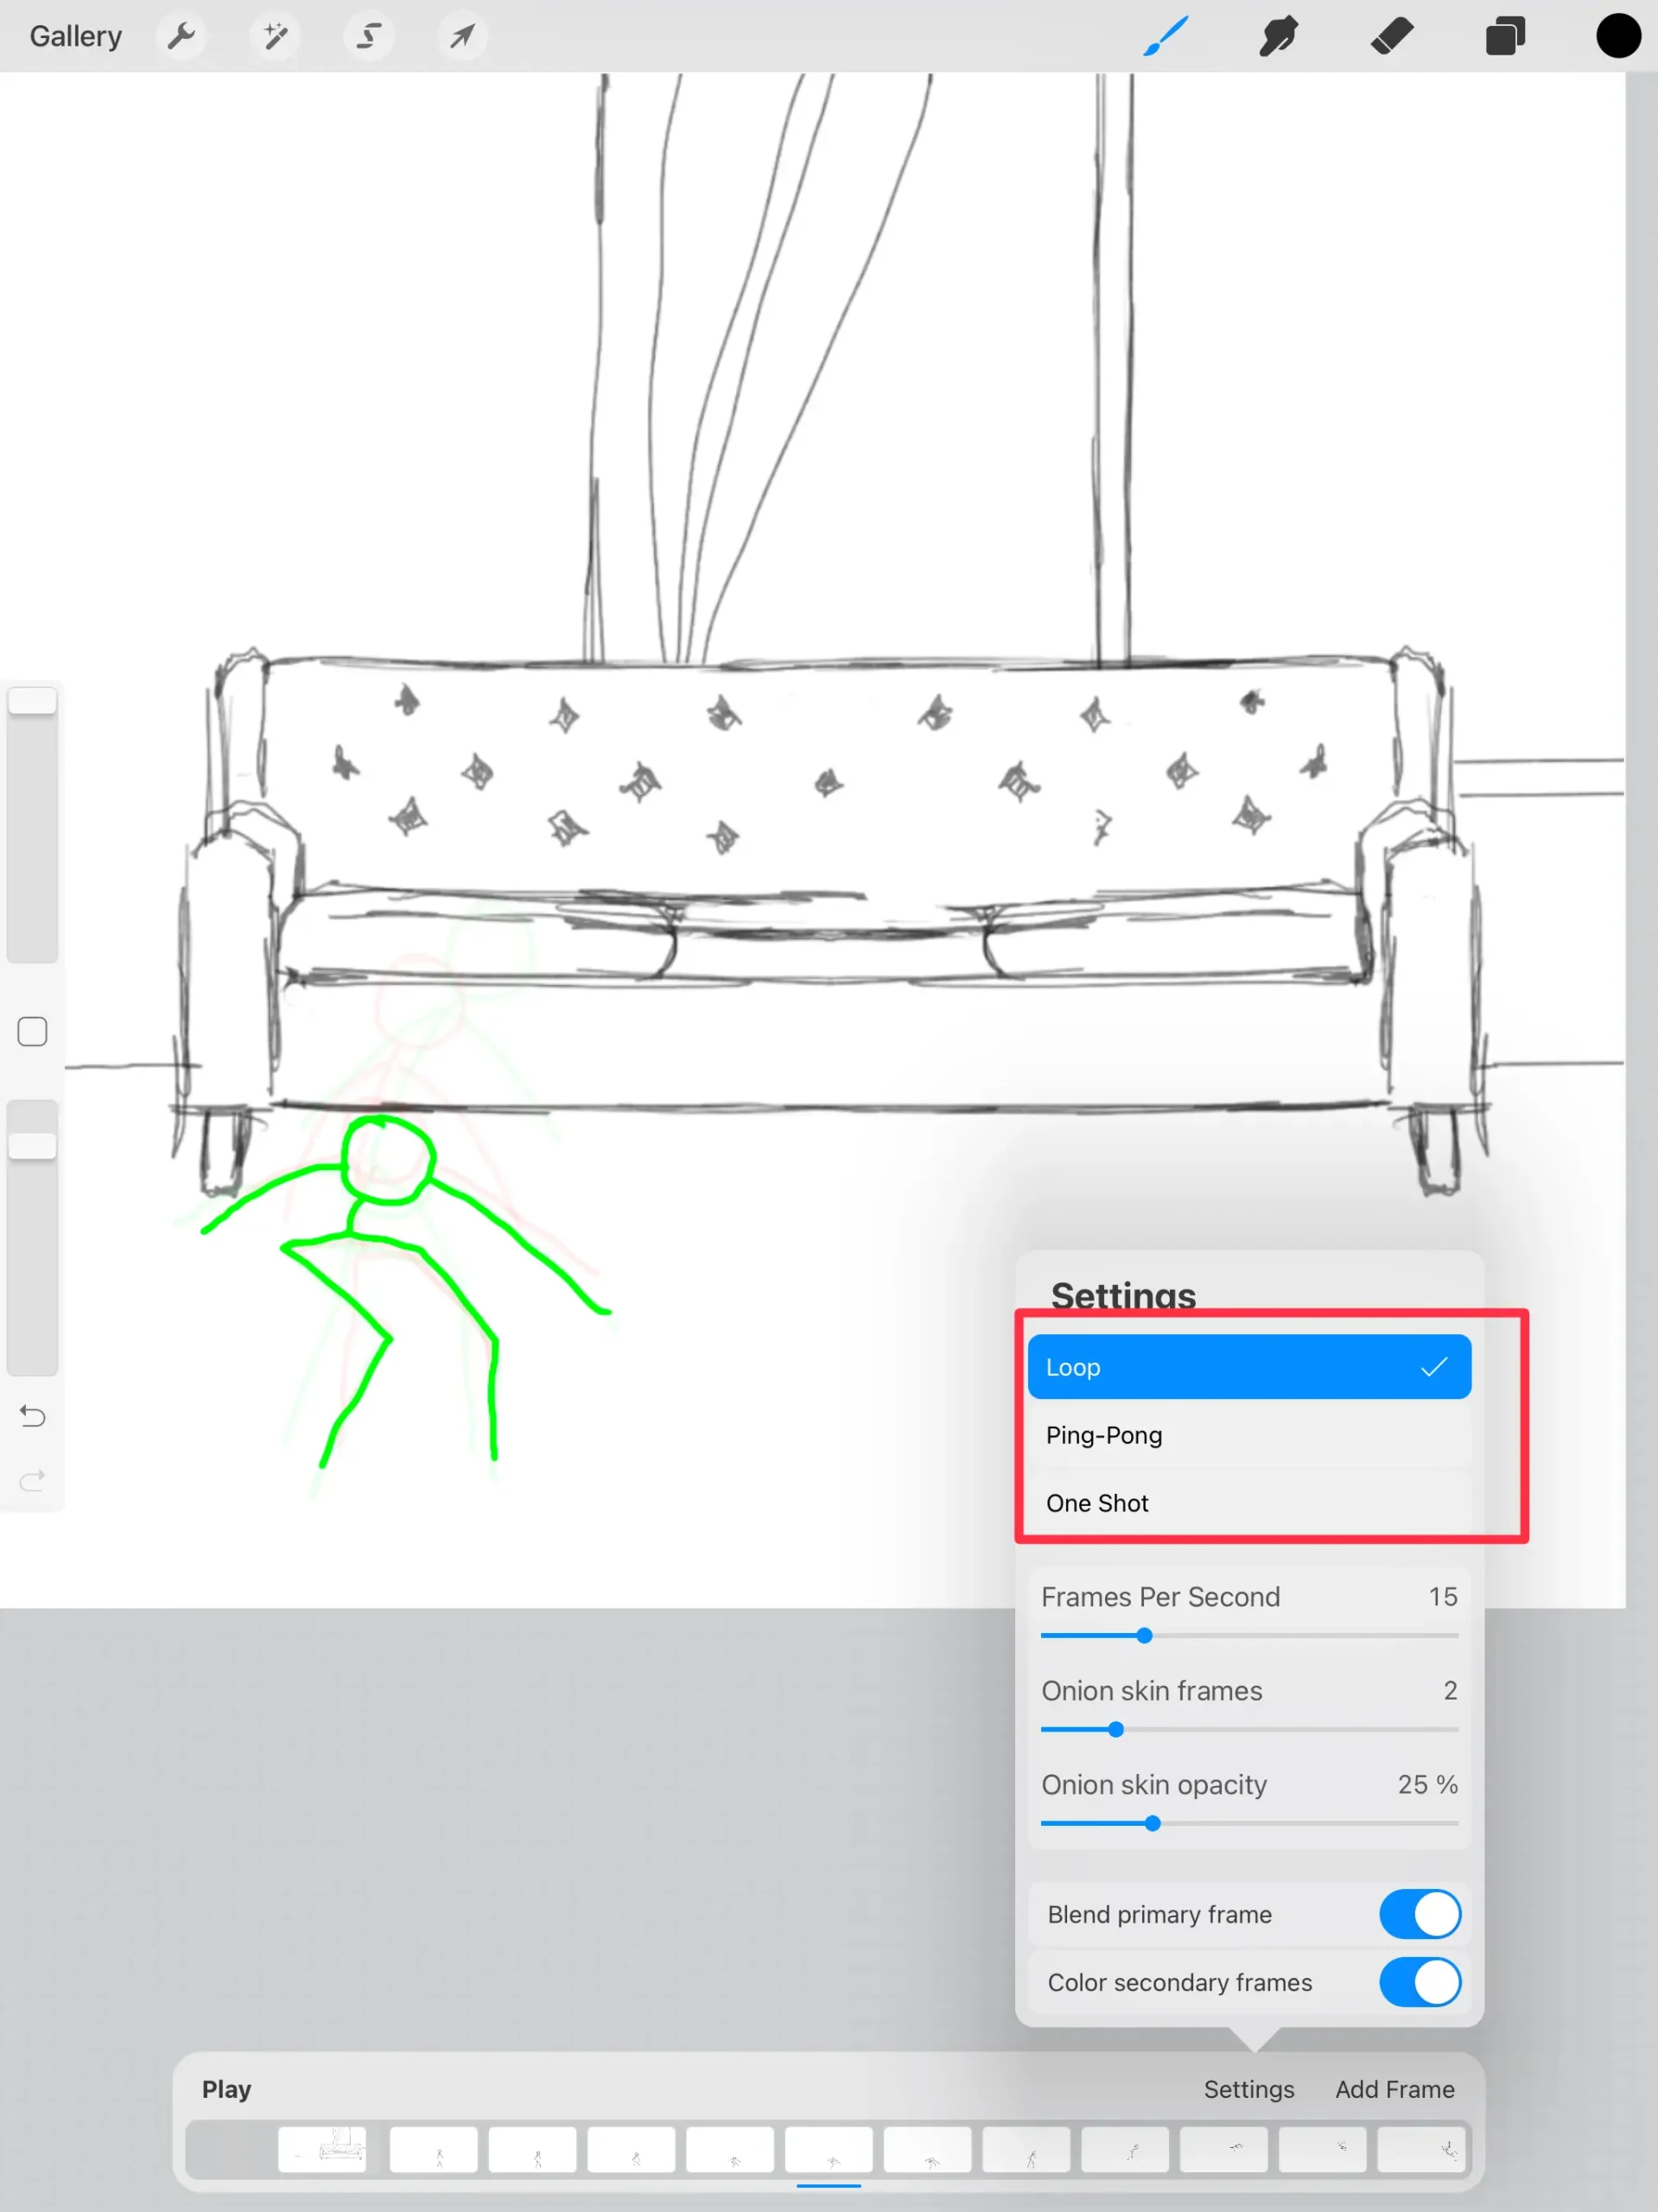
Using the Different Playback Types
In knowing how to animate in Procreate, you have a variety of different playback and export options for viewing your video.
Depending on what you are viewing the video for, you might find that some styles suit you more than others.
For example, if your plan is to simply show someone your animation while you work on it, you might opt for the one-shot playback option.
This feature will very simply play the video one time with all of the base settings in place.
On the other hand, if you are looking to spend more time watching and reviewing, you might opt for a loop instead.
Video loops will allow your video to play on endlessly until you physically stop them from doing so.
This can be great for taking time to observe different elements of your video without forcing you to continuously restart it.
It can make your editing process much easier.
The final playback option, and in my opinion, the best for reviewing, is the ping pong video.
The ping pong playback option is perfect for reviewing and editing because it plays your video backward and forwards.
It works in a way similar to a loop, but when it reaches the end, it plays in reverse.
Many people find that this is an amazing way to go about finding minor mistakes in animation.
As an added bonus, it really does look cool.
Making a video that plays well forwards and backward is definitely a great way to bring your animation to the next level.
If nothing else, it is pretty much always fun to watch.
Procreate Animation Tutorial
Here's a step-by-step tutorial on how to animate in Procreate.
Procreate Animation Tools
Procreate has some nice animation tools that you can use to make simple or even complex animations.
The most significant tool is Procreate Animation Assist and within that tool, there are other tools you can use to aid in your animating.
Procreate's Animation Assist allows you to create animations in an easy way.
Procreate Animation Assist
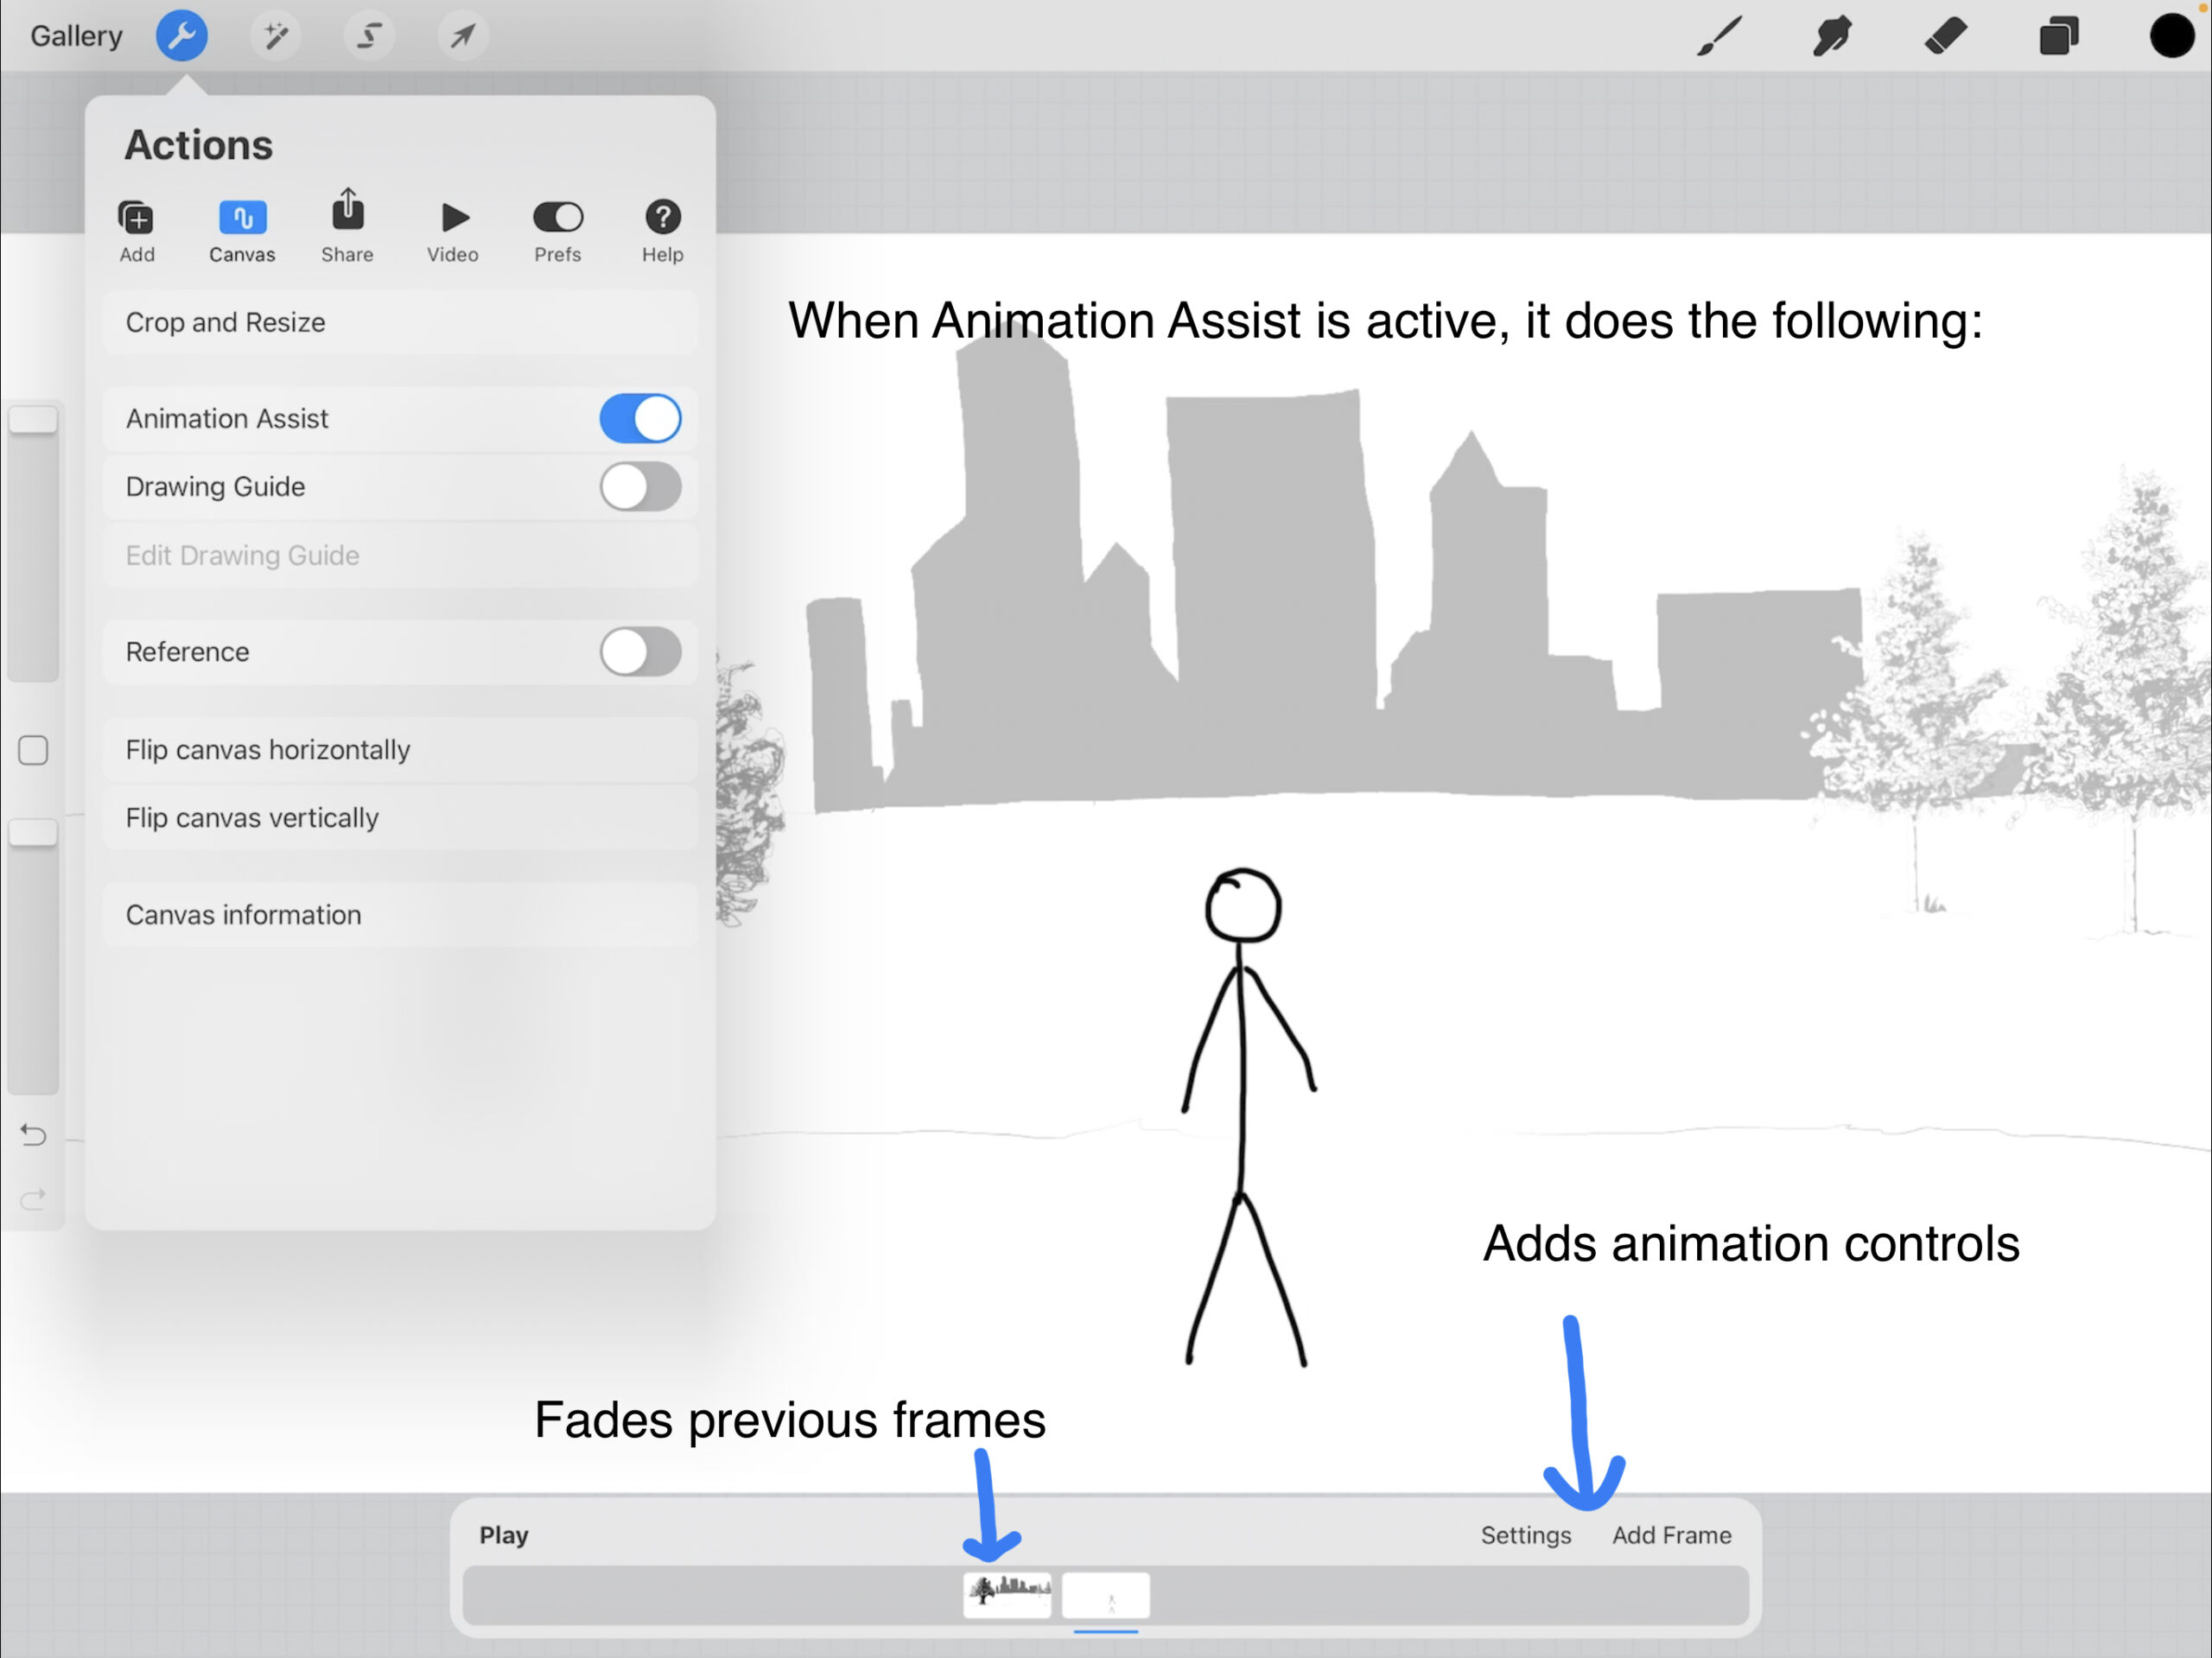
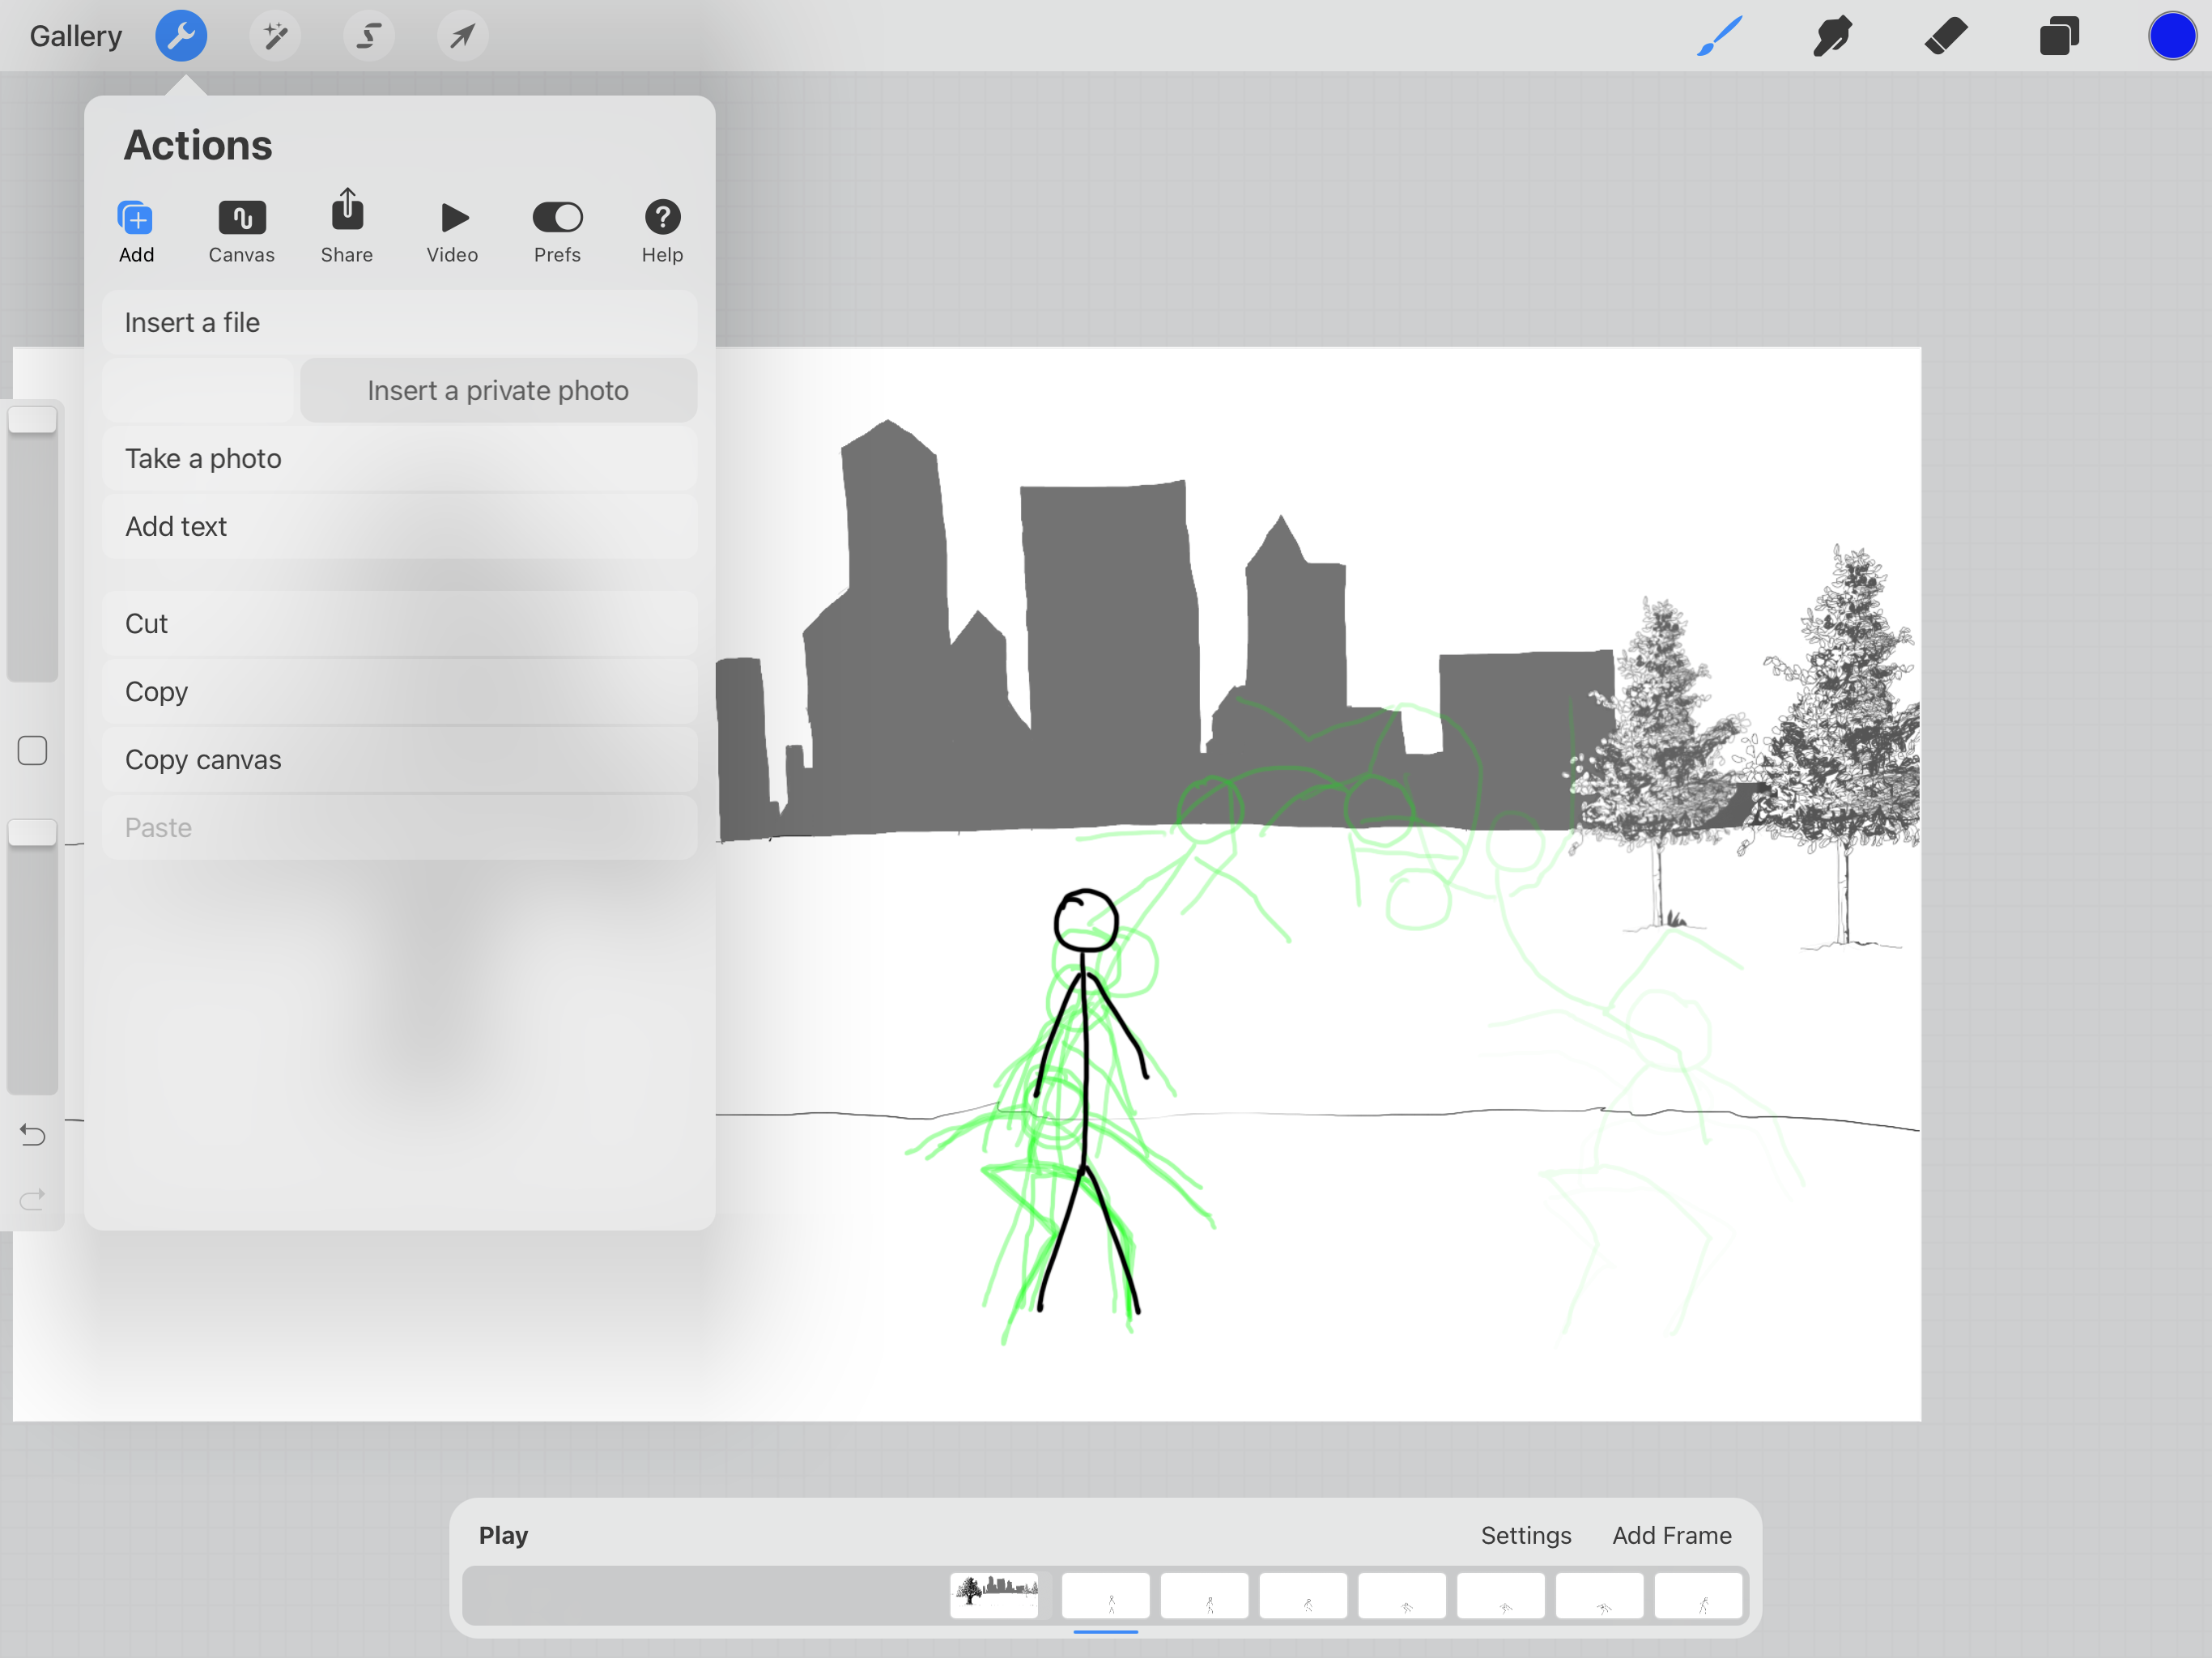
Here's how to use animation assist.
- Click on the wrench icon
- Click on the canvas option
- Switch on the animation assist
When you turn on the animation assist, it will add animation controls on the bottom of your screen and it will fade the layers (frames) below the currently active one.
Other Procreate Animation Tools
- Onion Skin
Onion skin is a tool that fades the previous frames, so you can see what you did in order to create your current frame.
On the animation controls, you press the settings option to get the onion skin controls.
You can also set the onion skin opacity, the onion skin frame amount, color the previous frames and the upcoming frames as two different colors, and blend the currently active frame.
- Hold Frame
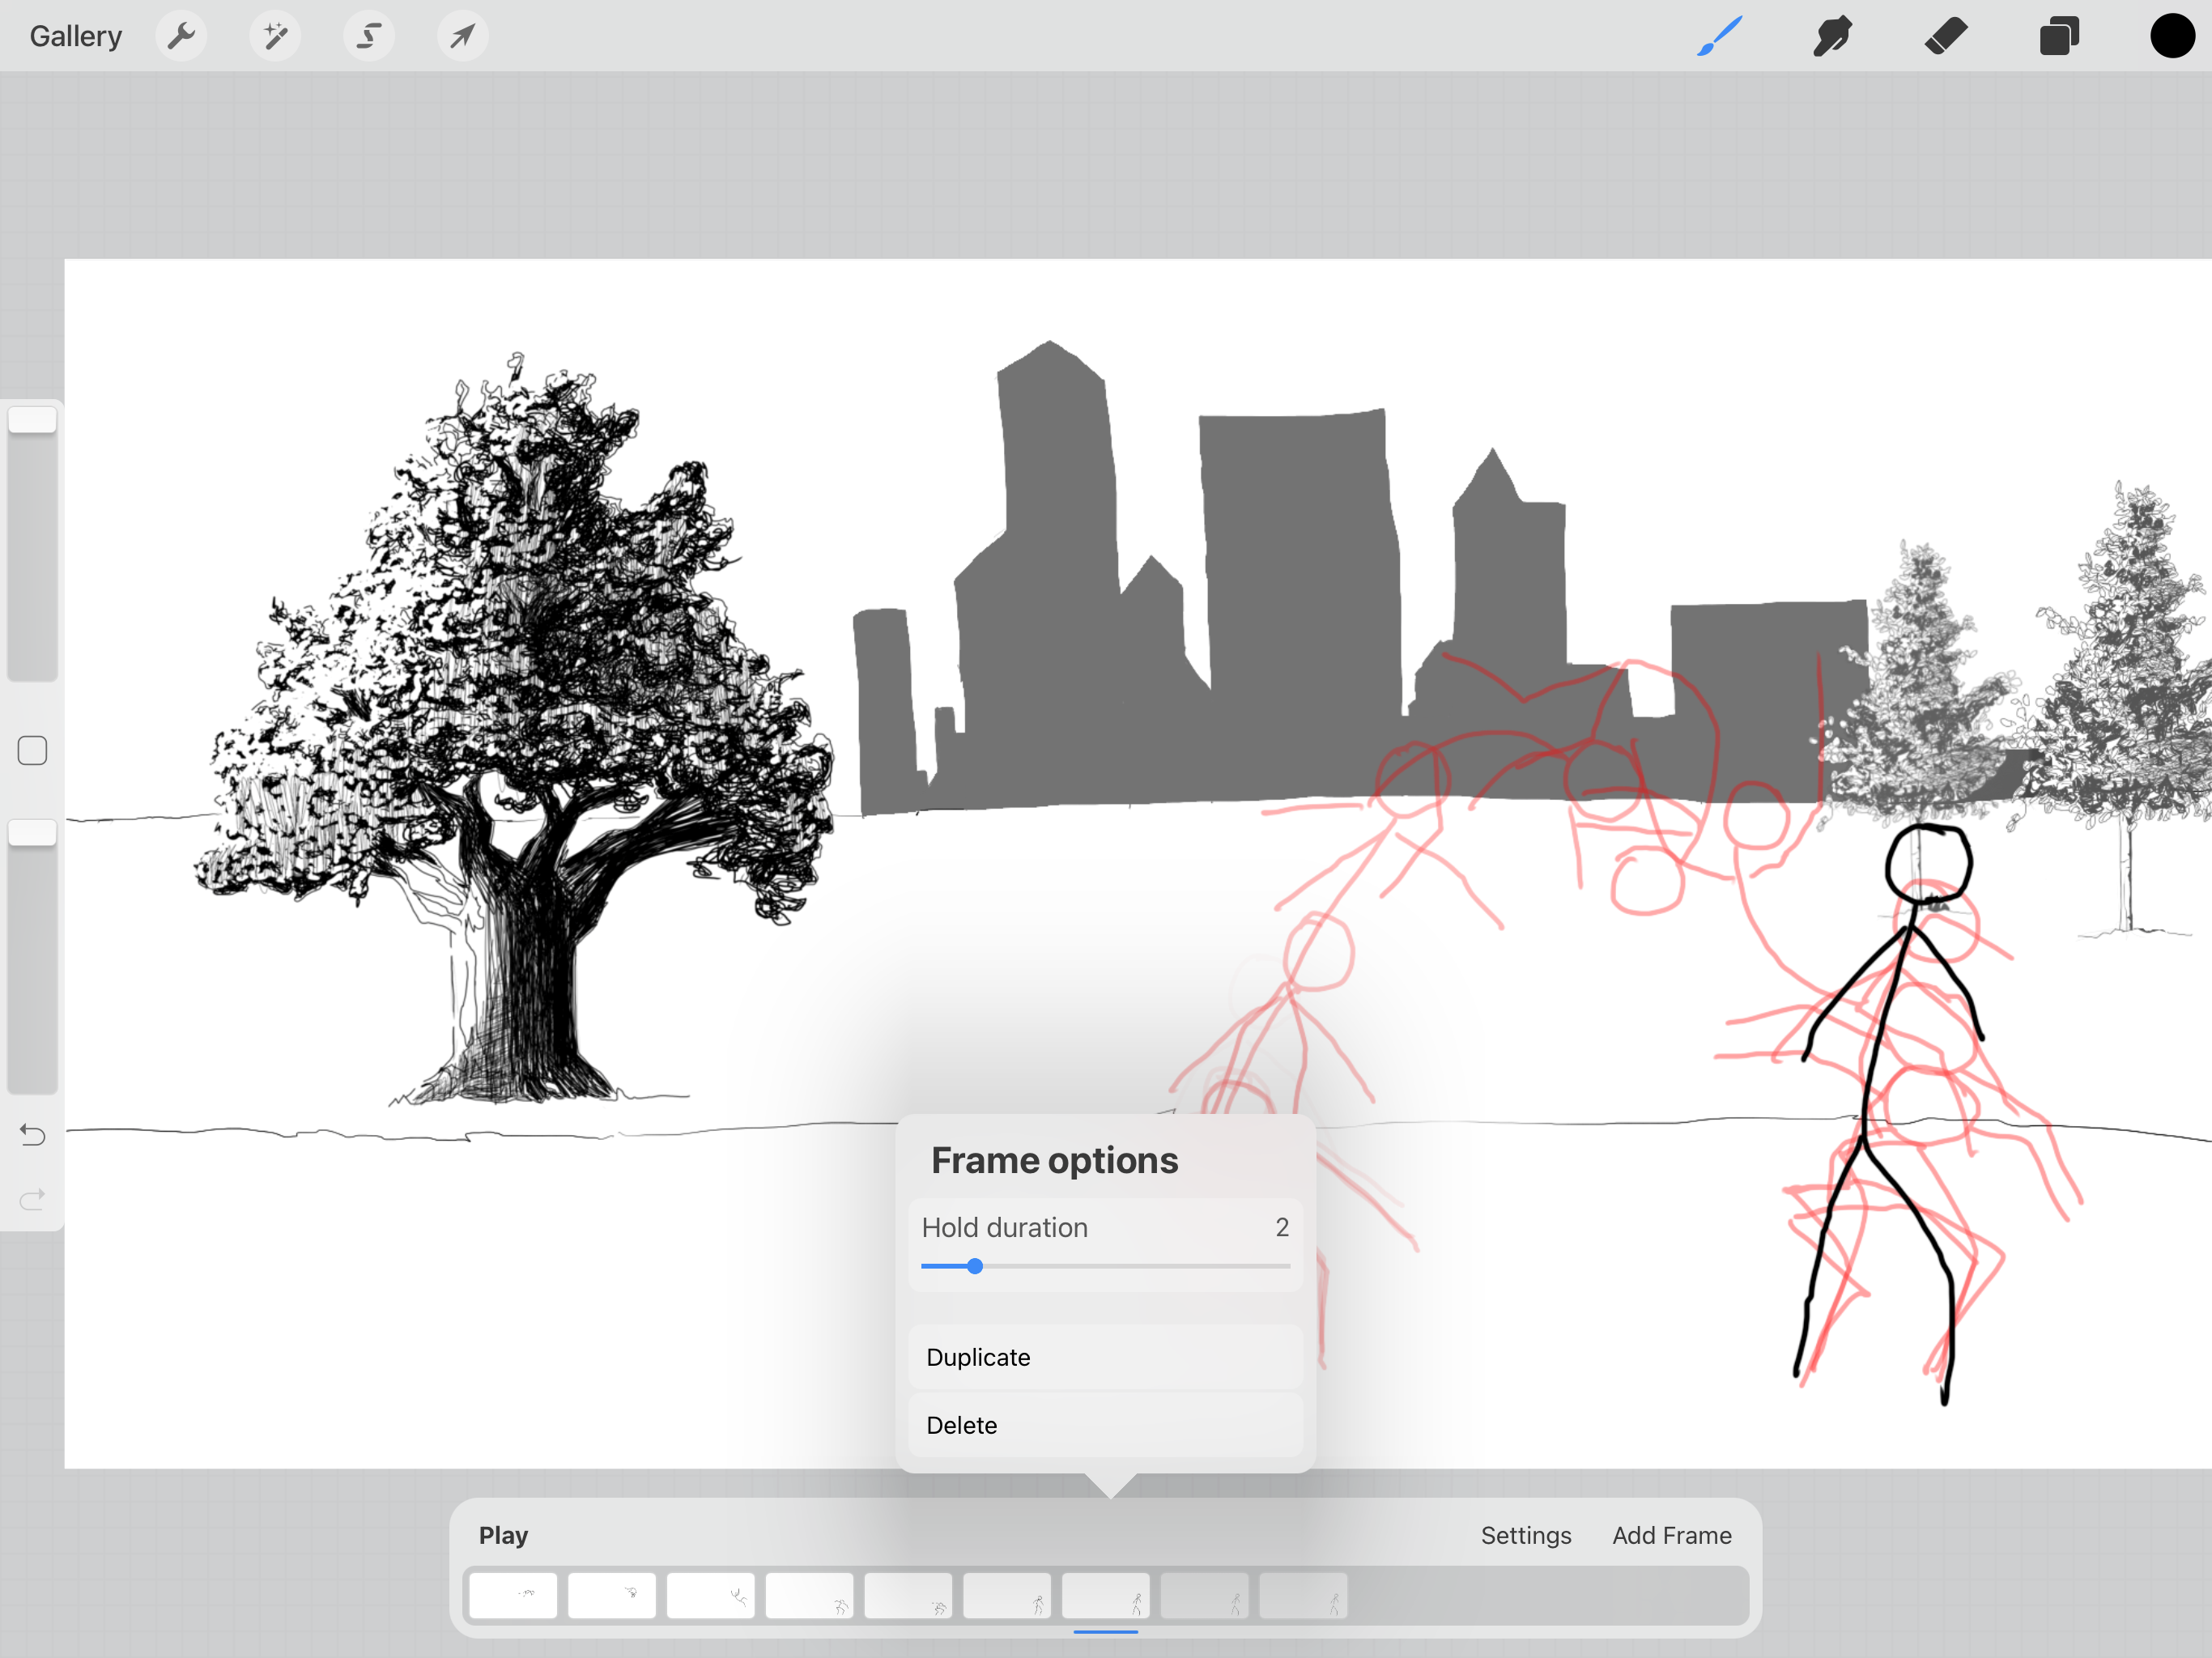
Hold frame allows you to pause the frame for a duration of your choosing.
Tap on a frame to activate the hold frame option.
If you choose the hold duration as 2, then it will automatically add two more frames identical to the frame you're holding.
- Foreground Layer

The foreground tool allows you to set a frame as the foreground element. So instead of drawing something in the foreground every time, you can set the frame as a foreground.
Tap on the frame to set it as the foreground.
You can only set the frame the is furthest to the right side or the topmost layer in your layers palette as a foreground. Make sure you don't have any hidden layers above this frame in your layers palette, as that can prevent you from setting the foreground parameter.
- Background Layer
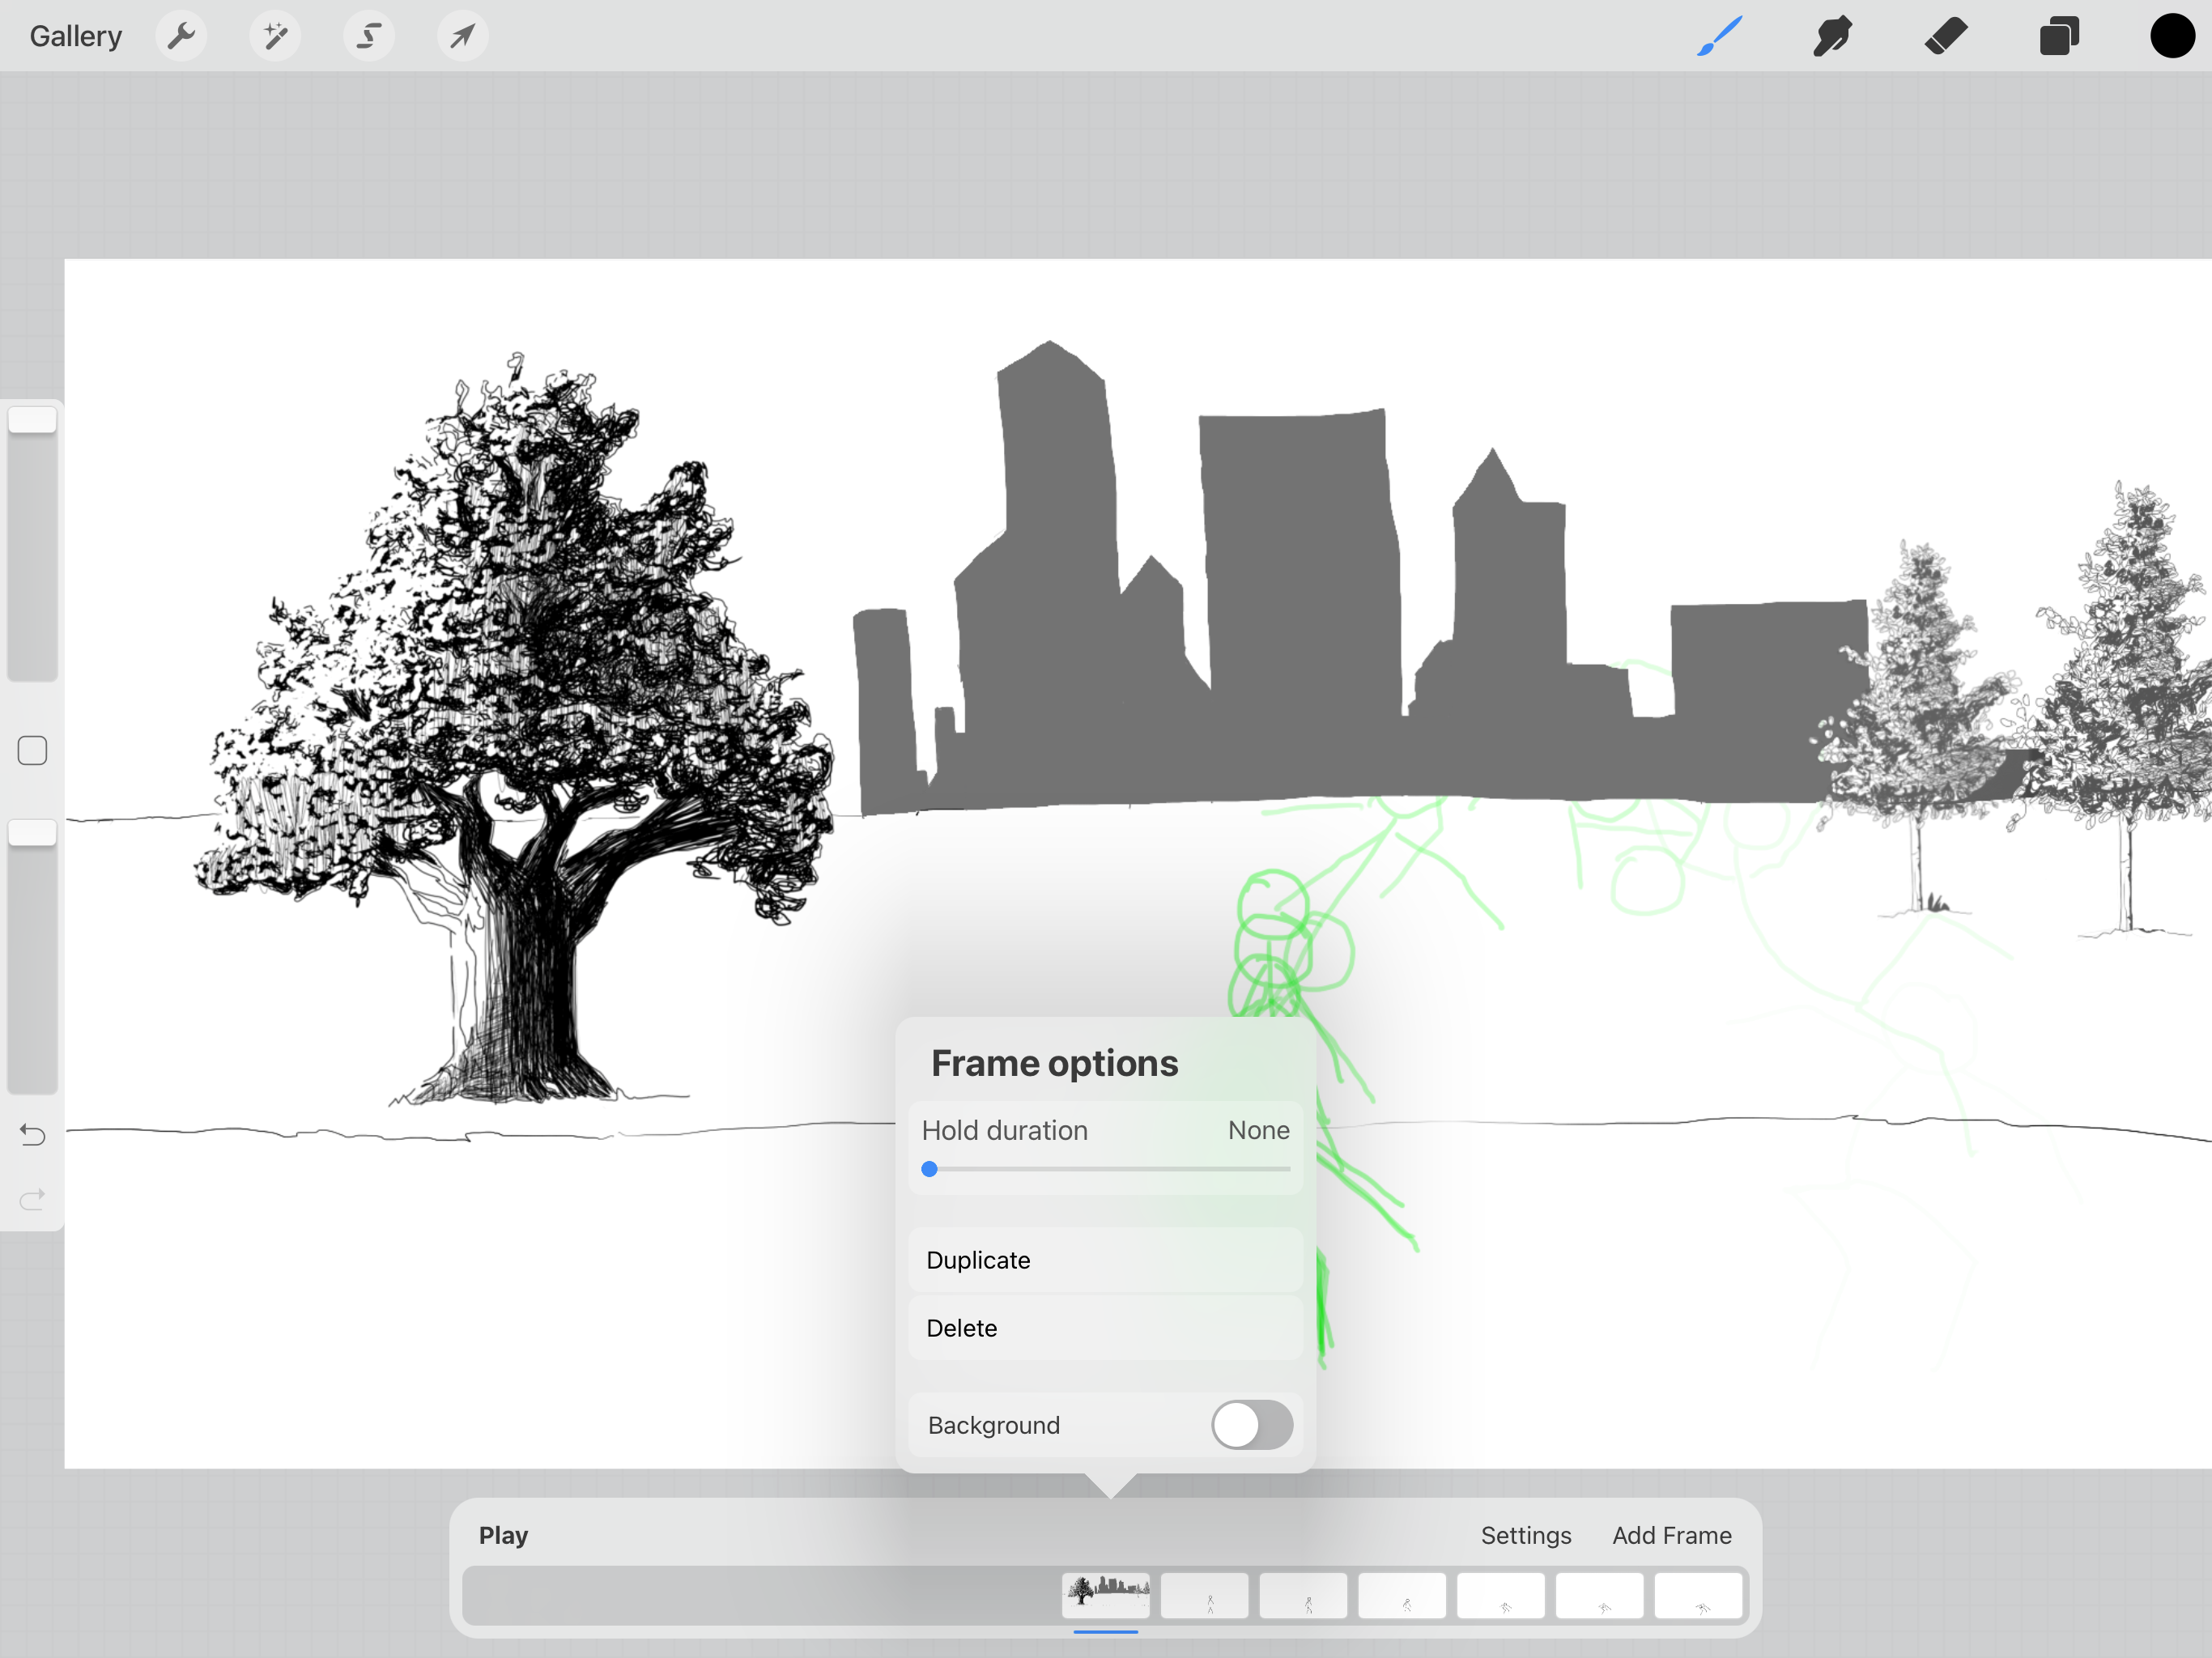
The background tool is like the foreground but it sets the background.
Tap on the frame to set it as the background.
Like with the foreground tool, you can only set the background to the furthest left frame or bottom-most layer in your layers palette.
- 4K Timelapse

You can set the quality of the timelapse setting when you first create a canvas. It's in the same area where you configure the dimensions.
You can set the recording in 1080p, 2K, or 4K. You can also set the quality.
It ranges from low quality to lossless. Low quality and good quality are small enough to send through email. Studio quality is better and lossless means that it doesn't lose any quality.
You can also set the timelapse to a different compression, which is HEVC. By default, it is turned off, but you can easily switch it on.
- Private Layer

Sometimes you may want to add a layer that doesn't get displayed in your timelapse playback. With the private layer tool, you can do this.Click on the wrench icon, then swipe right to left on the insert a photo, insert a file, or take photo options.
You will see a private layer pop up in the layers palette. The layer will be labeled "private".
Procreate Animation Tips
Here are some quick tips to help you animate in Procreate.
- Instead of redrawing a frame, use the duplicate frame option to create frames faster.
- Duplicate the artwork before merging layers to create a backup. Make sure your duplicated art is not immediately above the background color layer or the topmost layer. This will affect your ability to set a background or foreground in your animation.
- Start at the end – create your final scene first, and create the frames leading up to it.
- Import videos to use as a reference for your animation. You can record yourself walking, grabbing something, etc with your iPad and then import that into Procreate. Click the following to know the best iPad for Procreate.
- Turn oncolor secondary frames in the animation assist settings. This will color your previous frames and upcoming frames as two different colors to help you visualize your frames and create frames easier.
Procreate Animation Update
Procreate 5X is the latest update.
It features:
- Pencil filters
- Improvements to noise and blue filters
- Glitch, chromatic aberration, bloom, halftone and noise filter
- Gradient map
- FacePaint
- Private layer
- SwatchDrop
- iPad OS Scribble
- Capture colors from any photo
- Use drawing selections to automatically fill in colors
- Add or remove with any selection
- Transform with more precision by using the snapping or bounding box adjust feature`
- Blur brushes
- Home widgets allow you to jump straight to your art
- Customize shortcuts with quickmenu shortcuts
Other featured topics that will help with your Procreate art:
- 34 Procreate Artists Speak Out: "One Procreate Tip I Wish I Knew Before Using It"
- 581+ Free Procreate Brushes [ALL FREE & Updated]
- 18 Must-Know Procreate Tips for Beginners
- 53 Best Fonts for Procreate
- How Does Procreate Masking Work?
- What You Oughtta About Procreate Reference Layer
- Use Procreate without Apple Pencil (What You Oughta Know)
- Top 3 Hand Lettering Tips for Beginners
- What Are The Different Styles of Lettering?
- Hand Lettering Fonts: Essential Things You Need to Get Started
- 100 Best Digital Painting Tutorials to Help You Paint Like a Master
- 9 Digital Drawing Exercises To Help You Get Better at Digital Art
- 5 Cool Easy Painting Ideas That Will Inspire You
- Procreate Marker Brush Pack
Conclusion
Procreate has been an incredibly powerful artist's tool in recent years, and now they are that much better.
Bringing a seamless animation interface to the iPad has certainly taken them well beyond their competitors.
Fortunately, it means that artists everywhere are able to benefit from this and create some amazing works of art.
They have provided you with everything that you need to create amazing 2D animations.
Now the only thing left to do is get started. You have amazing works of art to create and we all can't wait to see them! Remember, animating can feel a bit strange at first.
Start small, and before long, you will be creating amazing videos!
Have you been looking forward to animation features in Procreate? What are your thoughts on Procreate's animation features?
Can you animate on Procreate?
Yes. You can create frame by frame animations with Procreate. You can also import video footage and create rotoscoped animation with Procreate.
Is Procreate good for animation?
Procreate is fantastic for animation. Someone who has never used Procreate could start using the app today and become really good at animating in Procreate within 24 hours. Procreate makes it easy for anyone to animate.
Can you make long animations in Procreate?
You can but because Procreate interprets each layer as a frame of animation, you're restricted to the length of the animation. What you would do is to create multiple animation segments and edit them together with video editing software.
How do you start an animation in Procreate?
You start an animation by switching on the "Animation Assist" option in the Actions>Canvas setting. Then, each layer you create is a frame in the animation.
How To Create Animation In Procreate
Source: https://jaejohns.com/procreate-animation/
Posted by: tanneronsch1951.blogspot.com
0 Response to "How To Create Animation In Procreate"
Post a Comment