

How To Draw A Christmas Tree With Ornaments
How To Paint A Christmas Tree – Iii Different Ways

Are you looking to learn how to pigment a Christmas Tree for your next acrylic painting project?
There's quite a few different ways you can paint Christmas trees! Depending on what style tree you want to do, different brushes and stroke techniques volition make the tree look different.
Free Download For This Tutorial!
Proceeds access to a Complimentary 8 page PDF printable for this tutorial! View information technology offline (ad-free), download information technology & print it. Discover out more here!


This blog post tutorial is meant to help you step past stride larn how to do the tree using iii different uncomplicated techniques (i with a fan castor, another with a circular brush and a 3rd with a vivid brush).

I did the three demos on heavy card stock paper. However, yous can paint these Christmas trees on just about any surface – canvas, wood, rock, etc.

Materials You'll Need
- Acrylic Paints (I'm using Liquitex Basics but yous can do these in any brand)
- Paint Brushes
- Fan Castor (For fan brush trees)
- #8 Round (For circular brush copse)
- #12 Bright (For flat brush trees)
- Colors (Your choice of greens can vary only I like to use a night green and a low-cal green for colour variety)
- Hookers Green Permanent
- Light Olive Green
- Titanium White
- Light Bluish Permanent (I used this to pigment the blueish background)
- Surface (I'm using heavy menu stock but yous tin pigment these trees on whatever surface)
- Want to download this tutorial?
Video Demo
How To Paint Fan Brush Christmas Trees
Fan brush trees are a lot of fun to create and yield I loftier success rate because of the nature of the brush. If yous oasis't checked out my post How To Paint A Tree With A Fan Brush, I encourage y'all to exercise and so because I go into more depth most that over in that location.
But this is specifically how to paint a dark-green Christmas tree with snowfall with the fan brush!

1. Paint The Background
These snow trees look best with a background that'due south either night or has plenty contrast and then the white snow shows up.
I did a very basic blue heaven groundwork with snowfall on the ground. To exercise that, pigment an ombré sky with light blueish permanent at the top (horizontal strokes) fading to titanium white. I did this with a large apartment castor.
I went virtually 3/4 the way down with this blue and white combo.
For the hill, I used pure titanium white and painted the rest of the way down the paper just making the "horizon line kind of lumpy".
And then I did a petty "shading" on the snow ground by blending a petty fleck of calorie-free blueish permanent on the very bottom and blending information technology support in the white.
Next you'll demand to make sure your background is dry before doing the tree! Apply a hairdryer or just expect for information technology to dry.
2. Load Your Fan Brush
When I load my brushes, I almost e'er load them in h2o kickoff and then I tap them dry a chip. This helps with the pigment flow. 
So load your brush in Hookers Dark-green Permanent (dark green). Stroke the pigment on your palette a bit so all the beard don't get clumped together and there'due south a squeamish even amount of paint on the bristles (especially on the tips).
When y'all showtime your tree, kickoff at the top and make a niggling vertical mark with the tip corner of the fan brush. 
Then concur your fan brush horizontally and gently tap just the tip of it to create horizontal strokes. 
Tap gently on the tip with the fan castor working in a left and right zig zag management. Your tree should be narrow at the top merely get thicker, wider as you lot go down. Think of it as filling in an invisible triangle.
Endeavor to get the branch edges on the sides of the tree to be thinner and so they go to a point. And too remember that you don't have to cover all the groundwork up. There is still sky showing through open areas of this tree.
The bottom should be the widest office of the tree. I did non exercise a tree trunk in this demo.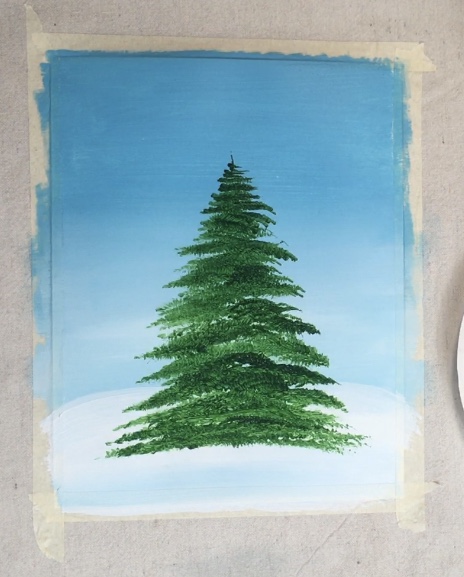
3. Paint The Snow
Yous'll desire to make sure your light-green on your tree is dry, otherwise you'll get low-cal green snow. 
Then generously clean your fan brush in water so no light-green residue is left on the bristles. Load it in titanium white the same manner y'all loaded the green. 
Pigment the snowfall using the exact same technique yous used to paint the green tree. Get-go at the top, get left and correct in a zig zag direction and tap very lightly.
Yous determine how much snow you want to cover your tree. I like the await of a slightly flocked Christmas Tree and then I left a lot of green still showing through but you can add more or less.

How To Paint A Round Castor Tree

This tree reminds me of a whimsical style of Christmas Tree. It looks different from the traditional fan brush or vivid castor fashion. I used a large #viii circular brush for this but the technique itself tin can exist done with any size round brush.

one. Set Your Groundwork Upward
I used the same background demonstrated above in the fan brush tree directions.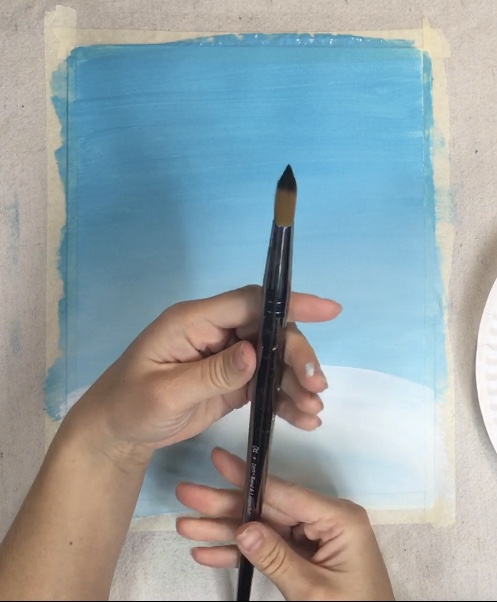
2. Start At The Top And Stroke Downwardly
I loaded just the tip of my castor in hookers green permanent. Grade a little triangle at the top and stroke each private stroke downwards.
As you work your way down, your tree needs to go wider. Remember of it like filling in an invisible triangle shape. Again, each individual branch stroke starts from top to bottom (stroking down).

This is a very bones tree! You can go out it like this and then go along to the snow step. I volition show y'all how to add together some interesting color and layers in it side by side.

I like to accept these round brush manner trees a step farther and add some other green in at that place. So I loaded my castor (it yet had hookers green on information technology) in light olive dark-green. 
Basically, re do all your strokes simply starting time at the bottom and work your way upwards. When you work from lesser to top, it will make the tree co-operative strokes wait like they are overlapping each other and give the tree some fun dimension. 
When loading my brush, I alternated betwixt light olive green and hookers light-green. This color variation helps with the layering effect. 
Keep to do these downwardly strokes up the tree. Y'all don't have to alternate the colors like a pattern, just load your castor in dissimilar variations of the greenish each time. 
three. Paint The Snow
Make sure your tree is dry. So clean your circular brush and load information technology in titanium white. I recommend starting from the lesser and working your way upwards. Do the same type of strokes you did to paint this tree.
Leave some infinite between each row of snowfall branches.
I'g pressing very lightly with this white. Yous can still see greenish through it.
Then I did go back and added a few bolder white strokes in in that location for some colour variation and added layers.
How To Pigment Bright Brush Trees
A vivid brush is a apartment brush that has shorter bristles for more command. This is a great brush to pigment trees with because you lot can exercise short niggling strokes. The technique in this demo is very similar to how I do the fan brush trees. This technique gives you a more than traditional looking snowy Christmas Tree.

one. Start At The Tiptop And Dab Short Niggling Strokes
Load just the tip of your brush in hookers green permanent. Starting time at the top and dab lilliputian strokes forming the shape of the tree as you work your way downward.
Much similar fan brush copse, I worked in a left and right zig zag direction. Pay actress attention to the branches sticking out on the left and right. They should exist sort of pointed at the tips. You can make them pointed down or up but keep the direction consequent (my branches are pointing downwards).


When you get to the bottom, you tin go back in and add a second coat of strokes sparingly throughout the tree. This gives some darker areas on the tree. 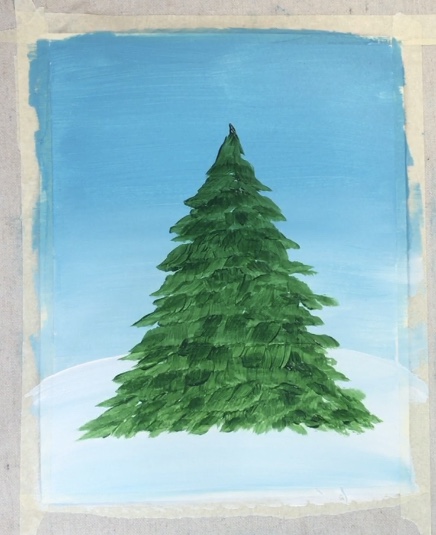
2. Paint The Snow
Allow the tree dry, completely clean the bright brush and load the tip in titanium white. Then do the same kinds of strokes. Start at the elevation, work your way down. 
Pay close attention to the branches on the left and right. Those volition exist extra vivid and white then make certain you add extra white in those areas. 
There'southward plenty of snowfall in the middle of the tree. Think of it as working in clusters merely be certain to get out green even so showing.

That's It!

These are three techniques that I use when painting snowy Christmas Trees! Add these to your winter landscape paintings, craft projects, Christmas cards, etc.
If you wanted to decorate the trees, you can merely await for the snow to dry and then paint ornaments, lights, a garland, etc.
Hope this tutorial helps with all your Winter Christmas art projects!
See As well…


Source: https://stepbysteppainting.net/2019/11/25/how-to-paint-a-christmas-tree-three-ways/
Posted by: tanneronsch1951.blogspot.com
0 Response to "How To Draw A Christmas Tree With Ornaments"
Post a Comment